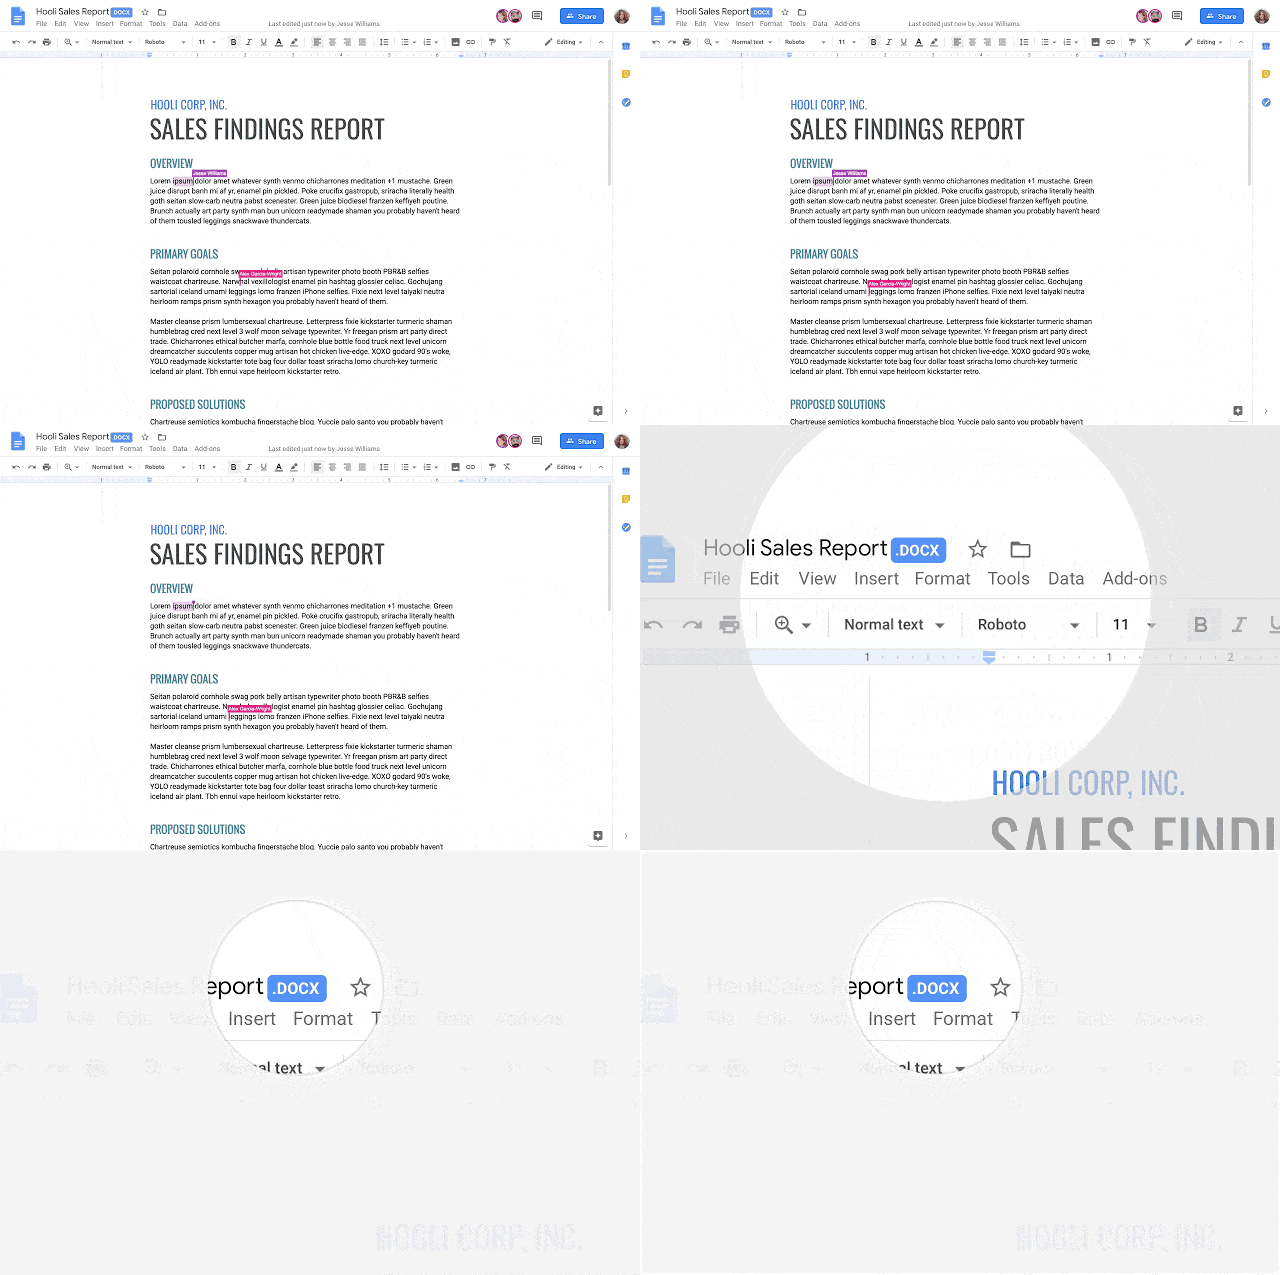
With Google Docs more popular than ever in education, I thought I should share some of my favorite tips.
Over the years, I have shared a lot of Google tips.
In this post, I’m pulling together ten posts with Google skills that every teacher should know.
From learning the basics, how to make a copy of files that have been shared online, creating template links, using voice typing, citing sources, inserting GIFs, editing images, using Docs offlines, and much more!
Listen to this article:
10 Google Docs Tips Every Teacher Should Know
1. File>Make a Copy
How to Make a Copy of Google Files IS A MUST-HAVE GOOGLE SKILL!
How to Make a Copy of Google Files
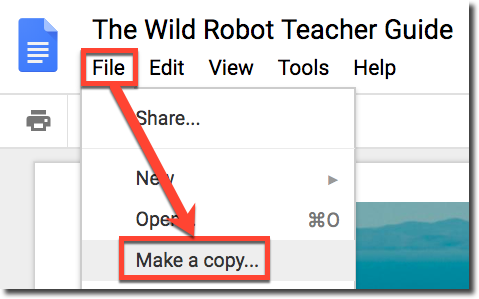
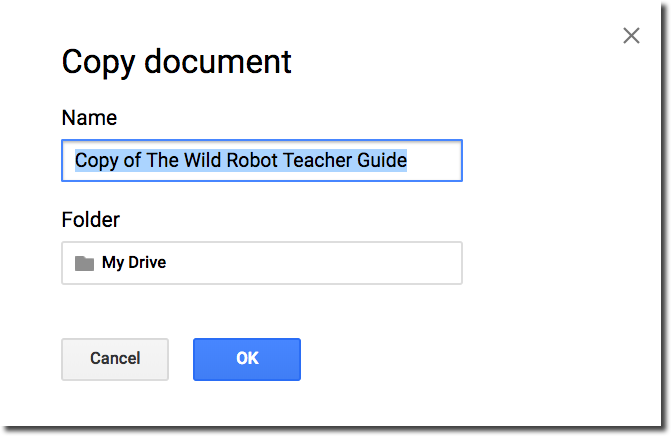
STEP 2: Go to the FILE menu and select MAKE A COPY.
STEP 3: A small pop up will prompt you to name your new copy and give you the option to organize it in one of your Google Drive folders. Click on the folder to select a different folder or create a new folder.
Note: If you are copying your own document, you will also see two checkboxes. (1) Share it with the same people, which will automatically share the new copy with the same people, and (2) Copy comments, which will automatically copy all of the comments from the original document to the new file.
2. Force a Copy
Here’s an easy way to force users to make a copy of Google Docs, Sheets, Slides or Drawings!
By hacking the URL you can prompt users to make a copy!
Have you ever shared a file with a student or colleague and instructed them to go to file>make a copy, and instead, they start typing on the document like it’s their own?
There are lots of ways to make a copy and distribute to students, like using Google Classroom or Doctopus, but this little trick is super simple!
Since Google Classroom solves this issue with students, this is mostly a trick that comes in handy when sharing with adults or on your website or blog.
How to Force a Copy of a Google Doc, Slide, Sheet, or Drawing
Here’s how it works!
STEP 1
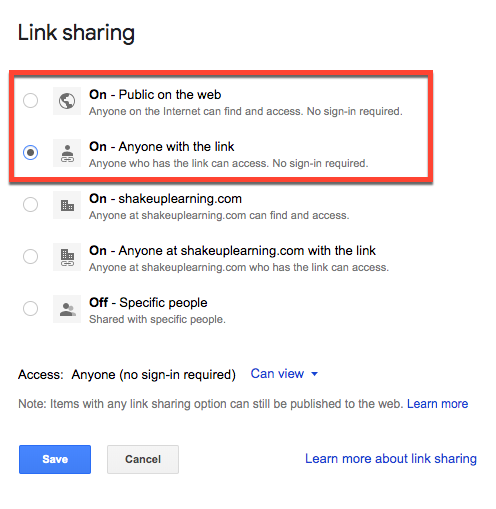
Be sure you have shared your document either as “anyone with the link,” or “public.” This has to be enabled before you can use the force a copy trick.
You could share it individually with the person, but that usually prompts a notification and they will see it in Drive and could still ignore your instructions.
(Do you need help with learning about sharing? Get my FREE Guide to Google Drive Sharing!)
STEP 2
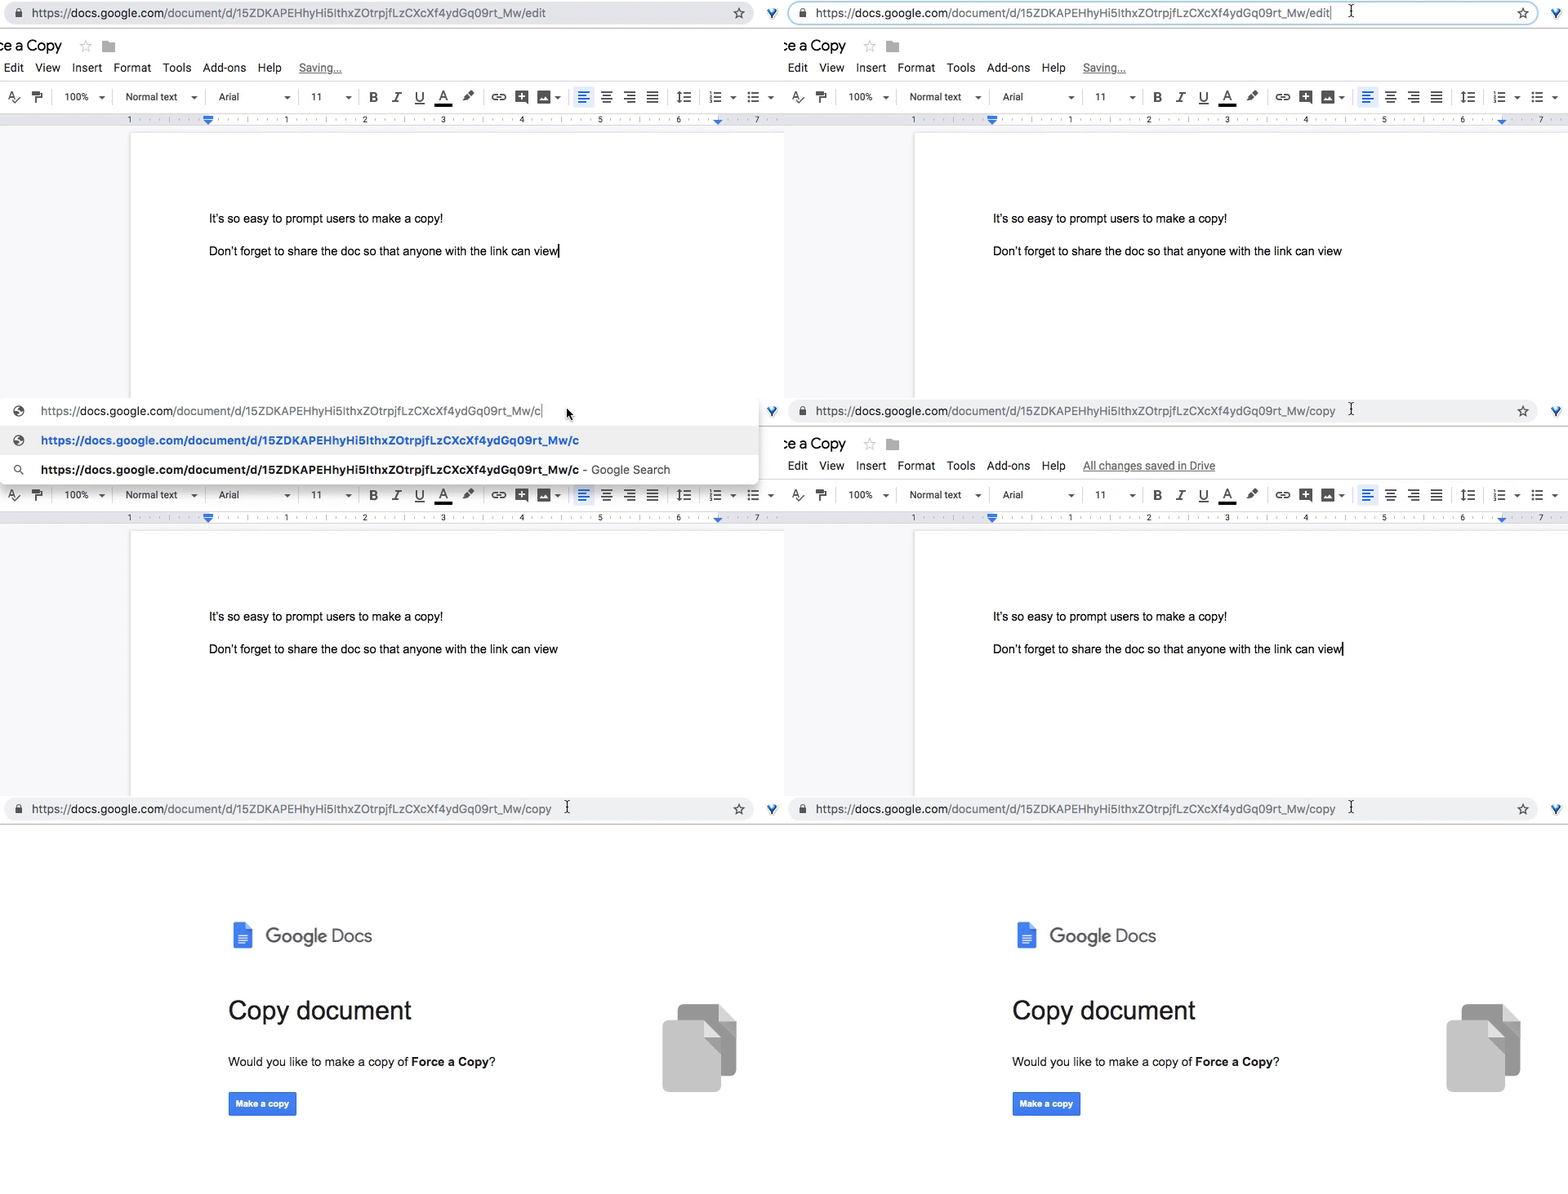
- Open the doc, slide deck, sheet, or drawing you want to use.
- Click in the search box and look at the end of the link.
- Replace the word EDIT with the word COPY in the link.
- Click return/enter.
STEP 3
Copy and paste this new copy link wherever you need–in an email, on your website, presentation, newsletter, etc.
Don’t forget STEP 1! If you haven’t made it shareable the link will not work!
When the user clicks on the copy link, they will be prompted to make a copy of the file.
Once they click the “Make a Copy,” button, it will make a copy of the file and add it to their Google Drive. AWESOME!
See this blog post for more tips on Forcing a Copy of Google files.
3. Template Links
Yes! This G Suite trick will let you change some words in the URL of your file and magically create a template link!
This is a game-changer, y’all! Templates make life easier, especially as a teacher. I make copies of interesting G Suite files and templates all the time. Sharing is caring!
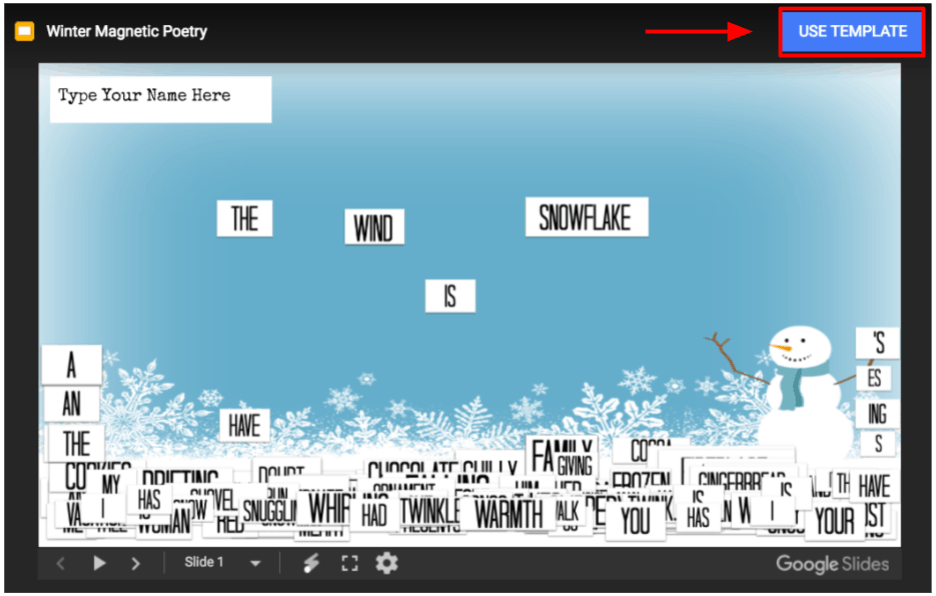
To change a Doc, Sheet, Slide, or Drawing to a template link, replace the word, “edit,” with the words, “template/preview.” Hit enter/return, and you will see a preview window with the magical, “Use Template,” button.
**Keep in mind that sharing rules still apply, so it still has to be at least viewable to whoever is “using the template.” To learn more about all the sharing options in G Suite, check out my Guide to Google Drive Sharing.
How to Create a Template Link
The Magical “Use Template” Button
Once you click the “Use Template,” button, the file is added to your drive and named exactly as the template. Oh, and it doesn’t have that annoying, “Copy of …” wording!
*NOTE: This option doesn’t work well on mobile devices. I would only recommend this for desktop/laptop.
See this blog post for more template link ideas!
4. Voice Typing
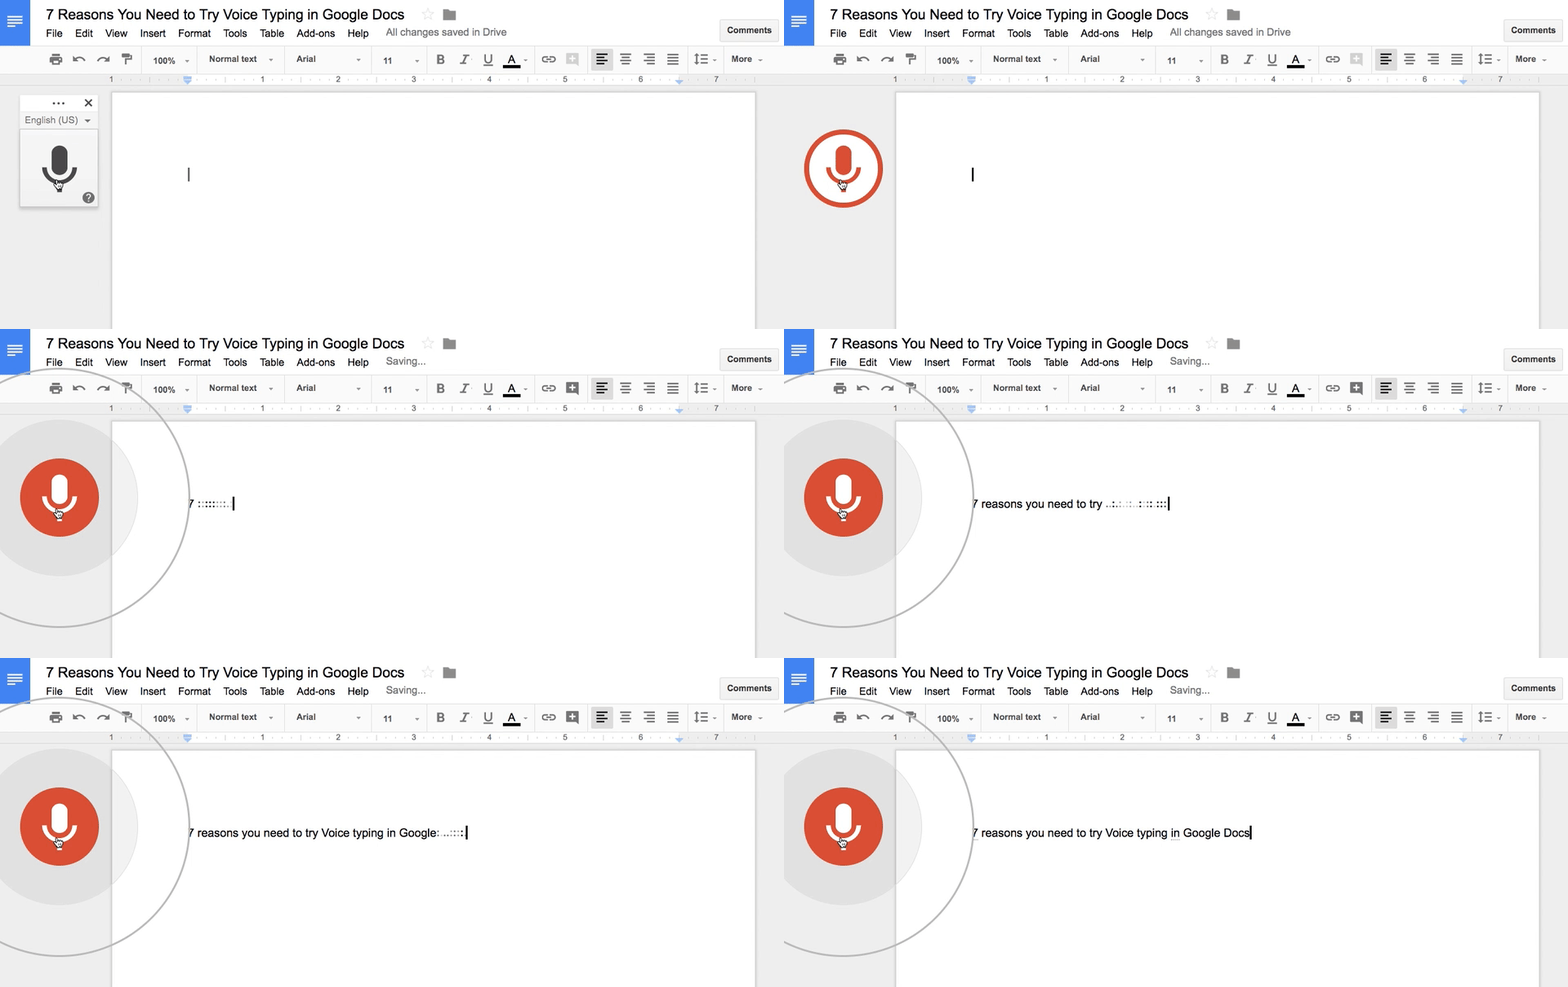
One tiny little feature that packs an amazing punch is Voice Typing in Google Docs. This is a speech-to-text feature that is built-in to the most popular word processor in the world, and it is available to you and your students if you have a microphone in your devices.
You can dictate all kinds of words, lists, and writing into Google Docs. You can also dictate formatting, punctuation, and editing. But wait…there’s more! YOU CAN DICTATE IN OTHER LANGUAGES!!!!! WHOA!!!!
How to Enable Voice Typing in Google Docs (desktop version)
Step 1: Turn on Your Microphone
To use voice typing or voice commands, your computer microphone needs to be on and working.
Step 2: Start voice typing in a document
- Check that your microphone works.
- Open a document in Google Docs with a Chrome browser.
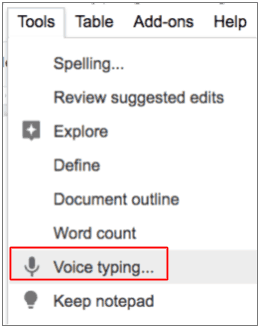
- Click Tools
Voice typing. A microphone box appears.
- When you’re ready to speak, click the microphone.
- Speak clearly, at a normal volume and pace (see below for more information on using punctuation).
- When you’re done, click the microphone again.
See this blog post for 7 Reasons You Need to Try Voice Typing in Google Docs.
5. How to Cite Sources
Did you know you can EASILY cite sources without ever leaving Google Docs? Yep! It’s so easy!
Insert Footnote Citation in Google Docs
You can easily add footnote citations by using the Explore tool in Google Docs. Even those footnote citations do not meet every need; it is so nice to have this built-in to Google Docs. This is light years above what I could get my sixth graders to do when it came to citing sources.
1. Go to Tools>Explore (or click on the explore icon 0n the bottom-right)
2. Type in your search query to find the source
3. Hover over the result, then click on the quotations in the top right of the result
4. A footnote citation will be added to the bottom of your doc
But Wait…There’s More! Change the Citation Format:
Yes! You can cite the source in MLA, APA or Chicago!!!!!
Go to the three dots (snowman) to change from MLA, APA, or Chicago.
Yep! It’s THAT EASY! Students today will never have to do citation the hard way some of us did. They won’t count spaces; they won’t have to suffer with citations the way some of us did.
I have a Google Doc with these directions that you can copy and share. CLICK HERE to make a copy of the directions.
See the full blog post for more citation tips.
6. How to Insert GIFs
In case you haven’t noticed, animated GIFs, those moving pictures that are almost like videos, are ruling the world. It’s not enough anymore to just have a cool image in your presentation; you need to engage them with a little animation. Better yet, GIFs offer an excellent way to show step sets to help teachers and students learn new skills!
Find a GIF
You can use the advanced search filter in Google images to find GIFs.
- Go to images.google.com and enter your search terms
- Click on the “search tools” button
- Under type, select “animated”
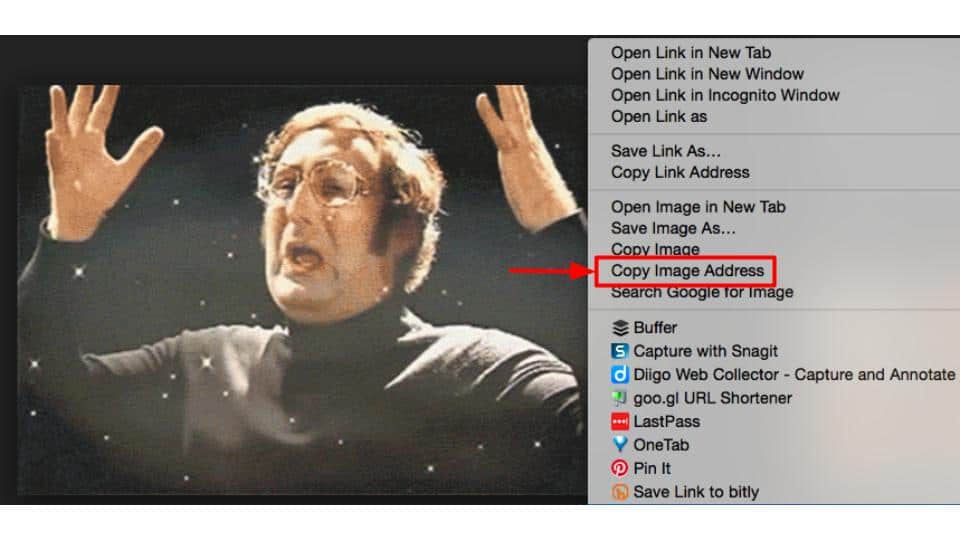
Copy the Image Address of the GIF
Locate the URL (or Image Address as it’s called in Chrome) of the GIF you wish to use. Simply right-click to copy the image address as shown in the animation below. (Note: this will vary in other browsers, but you should be using Chrome anyway!)
Insert By URL in Docs, Slides, Sheets, Drawings, etc.
The only way to get the animation to work is to insert by URL.
- Inside your document/slide, go to the Insert menu.
- Select Image
- Select By URL
- Copy and paste the image address you copied above.
- Click Select to insert the image.
- Voila!
So take the time to spice up your presentations, documents, and more with animated GIFs. It’s a great way to engage students (and adults). Your animations can be for humor and other emotional responses, or they can be to show how-to complete tasks as I did above.
Learn more about how to insert gifs in Google Docs and Slides here.
7. How to Edit Images
Did you know you can edit images inside Google Docs and Slides?
In just a few clicks, you and your students can add some pizazz to your images in Google Docs and Google Slides!
Resizing Images
You can easily resize images by selecting the image and clicking and dragging the blue “handles” until you have the desired size.
To keep the proportion ration, hold the SHIFT key as you click and drag. This will keep the image from looking out of proportion.
Resize Images by Clicking and Dragging
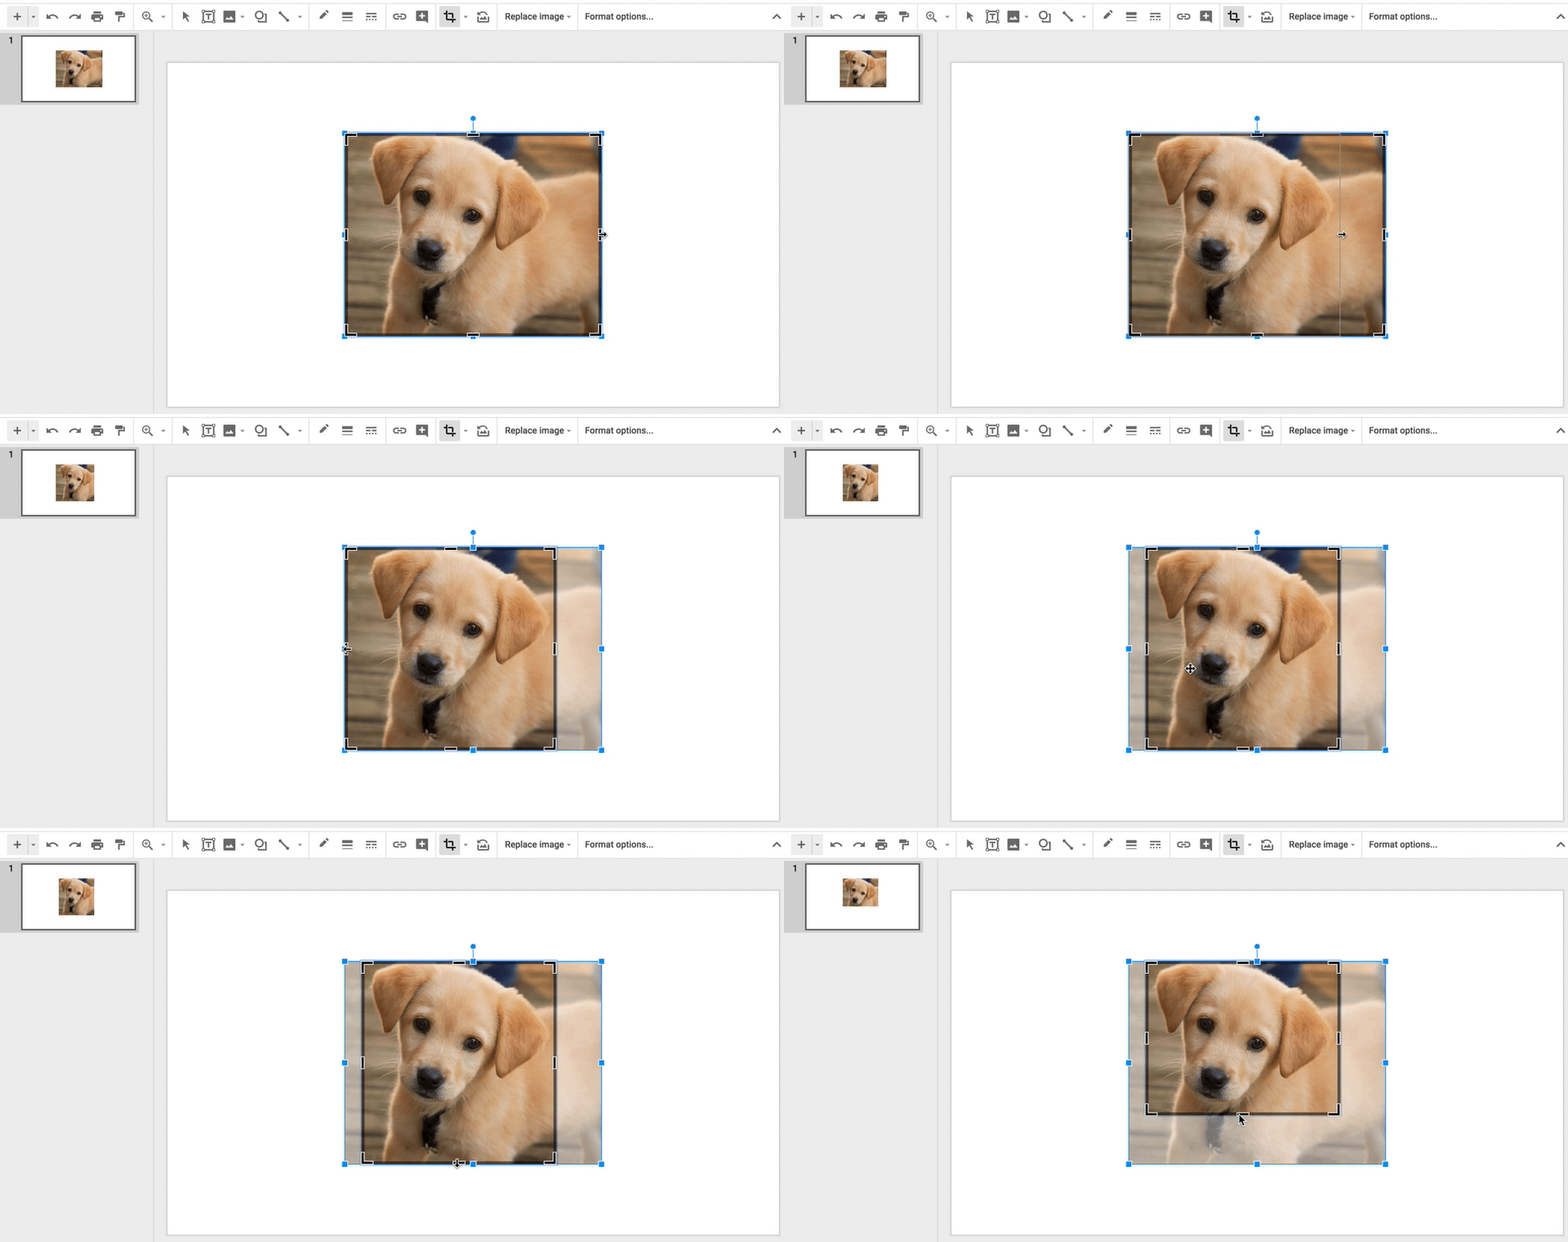
Cropping Images
1. Double-click the image you wish to edit or click on the crop button in the toolbar. (Please note, one click gives you the blue handlebars for resizing and moving. A double-click will give you the new cropping tools as seen below.)
2. Click and drag the black cropping bars on the corners and sides to crop your image.
Click and Drag the Black Bars to Crop
Add a Border
You can easily add a border to your images to give it a more professional look.
1. First, select the image, then choose your color using the drop-down next to the pencil tool.
2. The second tool allows you to choose the weight of the line. The third tool even lets you change the border to a dots or dashes.
(Image with 4pt orange border)
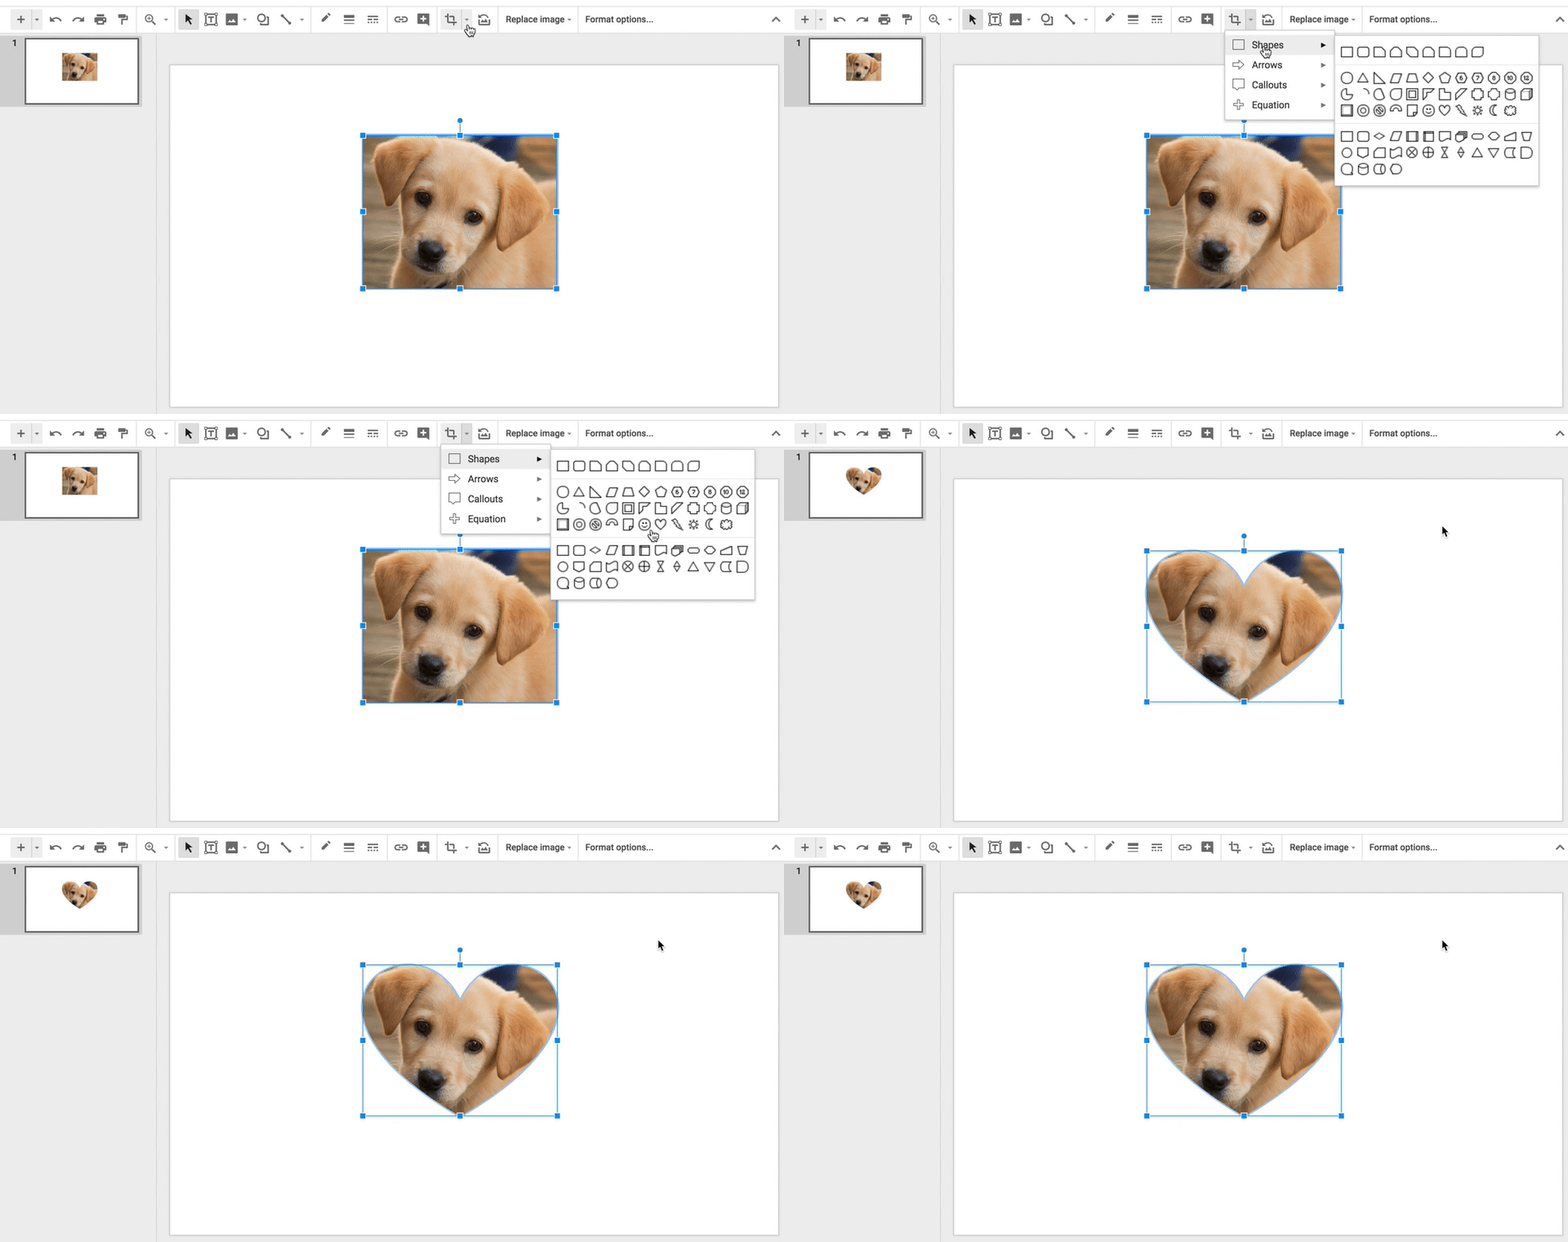
Reshaping/Masking Images (Google Slides only)
Google Slides gives you an additional feature you won’t find in Docs.
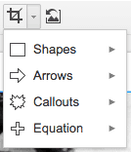
1. Select the image
2. Then click on the drop-down arrow next to the crop button in the toolbar.
3. Then select the shape. Voila! A new shape for your image!
Below is an example. There are many different shapes to choose from that will add a little something extra to your presentations.
Image Options (Google Docs)
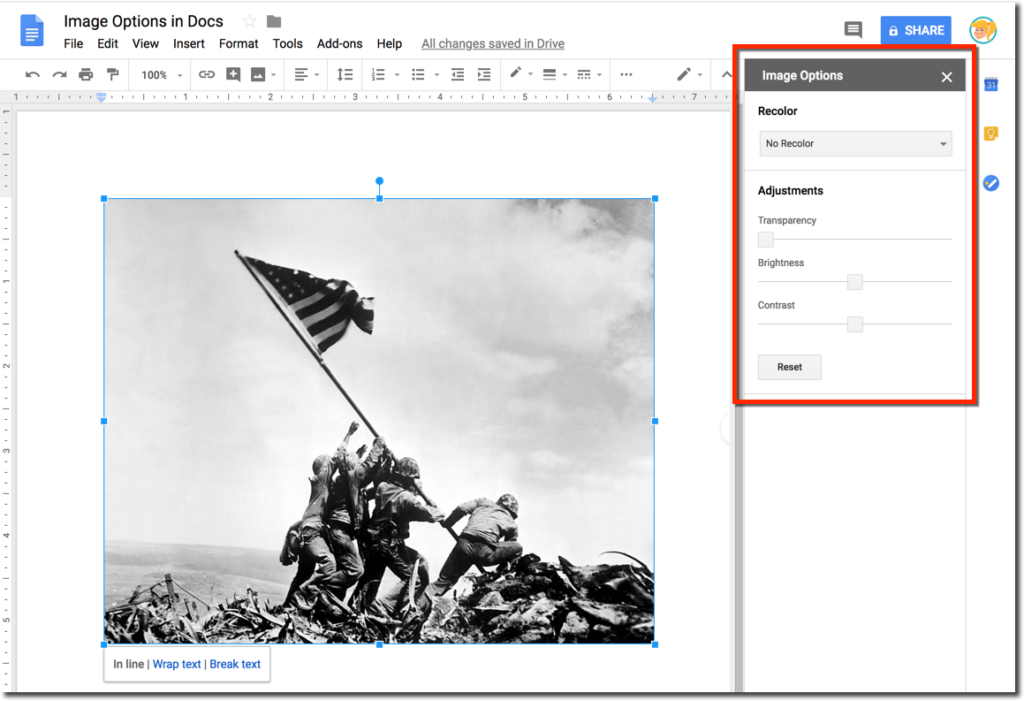
When you click on an image in Google Docs, you will see “image options,” in the toolbar. Clicking on “image options,” will open a sidebar menu where you can recolor your image (think Andy Warhol), and also adjust the transparency, brightness, and contrast of your image inside Google Docs, giving you some finer controls over the image.
Format Options (Google Slides)
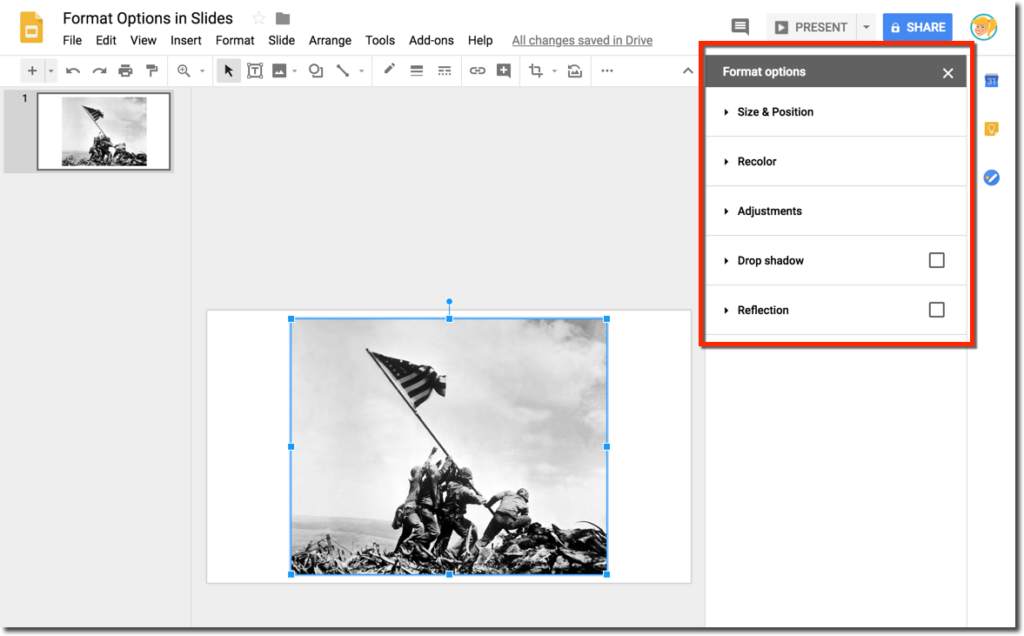
When you click on an image in Google Slides, you will see “format options,” in the toolbar. Clicking on “format options” will open a sidebar menu where you can fine-tune many different things on your image.
8. Use the Google Docs Explore Tool
The Google Docs Explore tool brings you quick access to your Drive files, web search, images, recommendations and more.
Explore is available in Docs, Sheets, and Slides and it uses machine learning to try to predict the things you need as you compose and create.
Please note, while this post is focused on the desktop/web version of Google Docs, the Explore tool is also available on mobile. (Android directions| iOS directions)
 What is the Google Docs Explore Tool?
The Google Docs Explore tool uses machine learning to suggest topics, images, and files from your Google Drive to help you create and compose.
You can also search the web, your Drive files, Google Images, and even cite sources using this fantastic tool.
There are two ways to access the Explore tool, (1) Go to Tools>Explore, or (2) Click on the Explore icon on the bottom right of your page.
A new sidebar panel will open giving you access to many different features as shown in the animation below.
Click here to learn 5 Ways to Use the Google Docs Explore Tool.
9. How to Edit Microsoft Office Files in Drive (without converting)
This is the best of both worlds!
If you are using Google Drive to store your files, you may find yourself with some Microsoft files that you would like to edit without having to download and open in their native applications.
How to Edit Microsoft Office Files in Google Drive
To be clear, this post is about editing native Office files in Google apps without converting. Please remember that formatting will get wonky! But it is nice to have this ability when you need it.
Files Supported
I wish I could say that all Microsoft files could be edited from Google Drive, but there are only three, Word, Excel, and PowerPoint.
The following Office file types are supported:
- Word files: .doc, .docx, .dot
- Excel files: .xls, .xlsx, .xlsm (macro enabled Excel files), .xlt
- Powerpoint files: .ppt, .pptx, .pps, .pot
Note: If you edit Word, Excel, or PowerPoint documents older than Office 2007, files will be saved to a newer format when editing using Office editing.
Learn more about using this feature on this page.
10. How to Access Google Files Offline
Sometimes we need to work on our Google Drive files when we don’t have an Internet connection. So I’m going to show you how to access files in Google Drive using the Google Docs offline extension.
This comes in handy when you are traveling.
It is also a great tool for students and teachers with limited or no Internet access at home.
This process varies by device.
This is NOT the same as backup and sync, which stores ALL your files on your local hard drive. This method shows you how to select individual files that you would like to make available for offline access.
If you aren’t connected to the Internet, you can still view and edit files, including:
- Google Docs
- Google Sheets
- Google Slides
Save and open Google Docs, Sheets & Slides offline
Before you turn on offline access
- You must be connected to the internet.
- You must use the Google Chrome browser.
- Don’t use private browsing (incognito).
- Install and turn on Google Docs Offline Chrome extension.
- Make sure you have enough available space on your device to save your files.
Open Google Docs, Sheets, and Slides offline
- Open Chrome. Make sure you’re signed in to Chrome.
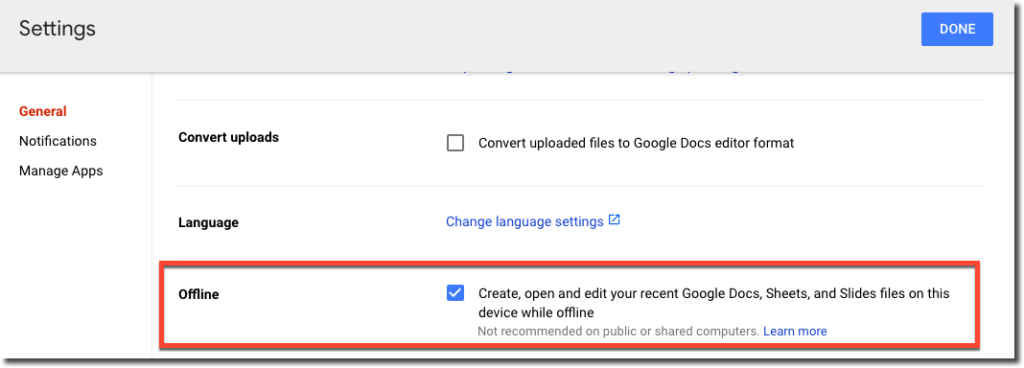
- Go to drive.google.com/drive/settings.
- Check the box next to “Sync Google Docs, Sheets, Slides & Drawings files to this computer so that you can edit offline.”
Save Google Docs, Sheets & Slides for offline use
- On your computer, go to drive.google.com.
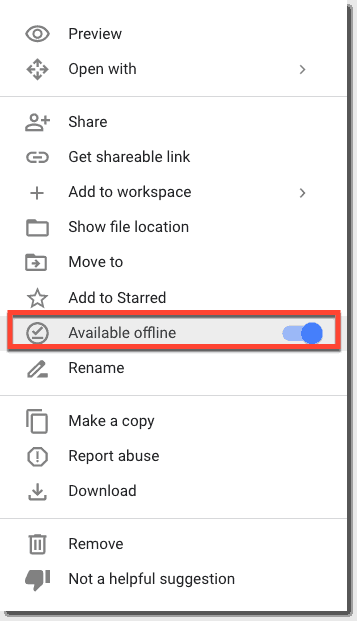
- Right-click the Google Docs, Sheets, or Slides file you want to save offline.
- Turn on “Available offline.”
To save multiple files offline, press Shift or Command (Mac)/Ctrl (Windows) while you click other files.
Preview offline files
- On your computer, go to drive.google.com.
- Make sure you turn on offline access first.
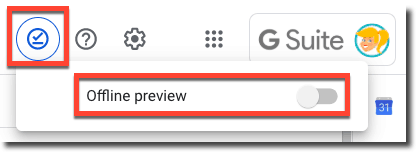
- At the top right, click Ready for offline
.
- Click Offline preview.
Learn more about offline access, and how it works on mobile devices in this post.
© Shake Up Learning 2023. Unauthorized use and/or duplication of this material without express and written permission from this blog’s author and/or owner is strictly prohibited. Excerpts and links may be used, provided that full and clear credit is given to Kasey Bell and Shake Up Learning with appropriate and specific direction to the original content on ShakeUpLearning.com. See: Copyright Policy.



 What is the Google Docs Explore Tool?