Remote learning has sent teachers and schools into high gear! We are all trying to figure out what works. In this post, I’m going 
This has never been done before, not like this, so cut yourself some slack. We are all learning together!
Most schools have come to rely heavily on Google and G Suite for Education tools. I’ve put together some of my favorite Google tips and hacks to help you during remote learning and beyond!
Remote learning has sent teachers and schools into high gear! We are all trying to figure out what works. In this episode and post, I’m going to show you 10 Google Tips for Remote Learning.
Listen to this article.
Quick Tip: Crop Images in Docs, Slides, and Drawings
Did you know you can crop images in Google Docs, Slides, and Drawings? It’s super easy!
Watch this quick video to learn how!
10 Google Tips for Remote Learning
Let’s start with Google Slides, which is not only my favorite but a go-to for remote learning. Teachers often use Google Slides for their lessons, both as a presenter, but also to create interactive lessons, choice boards, Hyperdocs, and more. Students use Slides to create and demonstrate their learning.
One struggle many teachers have faced is presenting their Slides during a remote learning class via Google Meet, Zoom, or other video-conferencing applications.
#1 Slides Tip: Publish to the Web When Sharing Your Screen
I’ve used this feature for years. In fact, this is how I always share links to my presentations and embed them on this website. But this feature also comes in handy when you are presenting your screen during a virtual presentation.
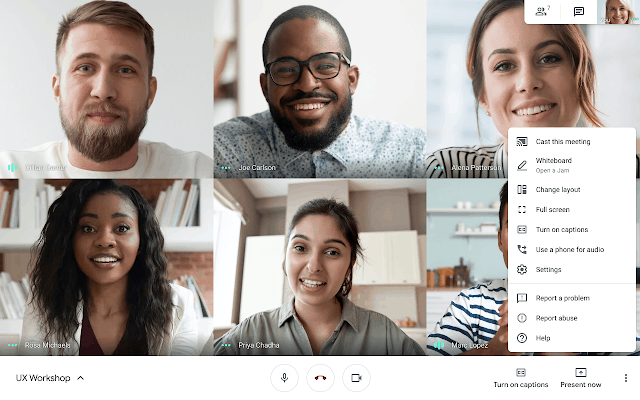
The problem: When you share your screen and click on the “present” button in Slides, you can no longer see your participants, the chat, or other options.
The solution: Instead of clicking the “present” button, use the publish to the web version!
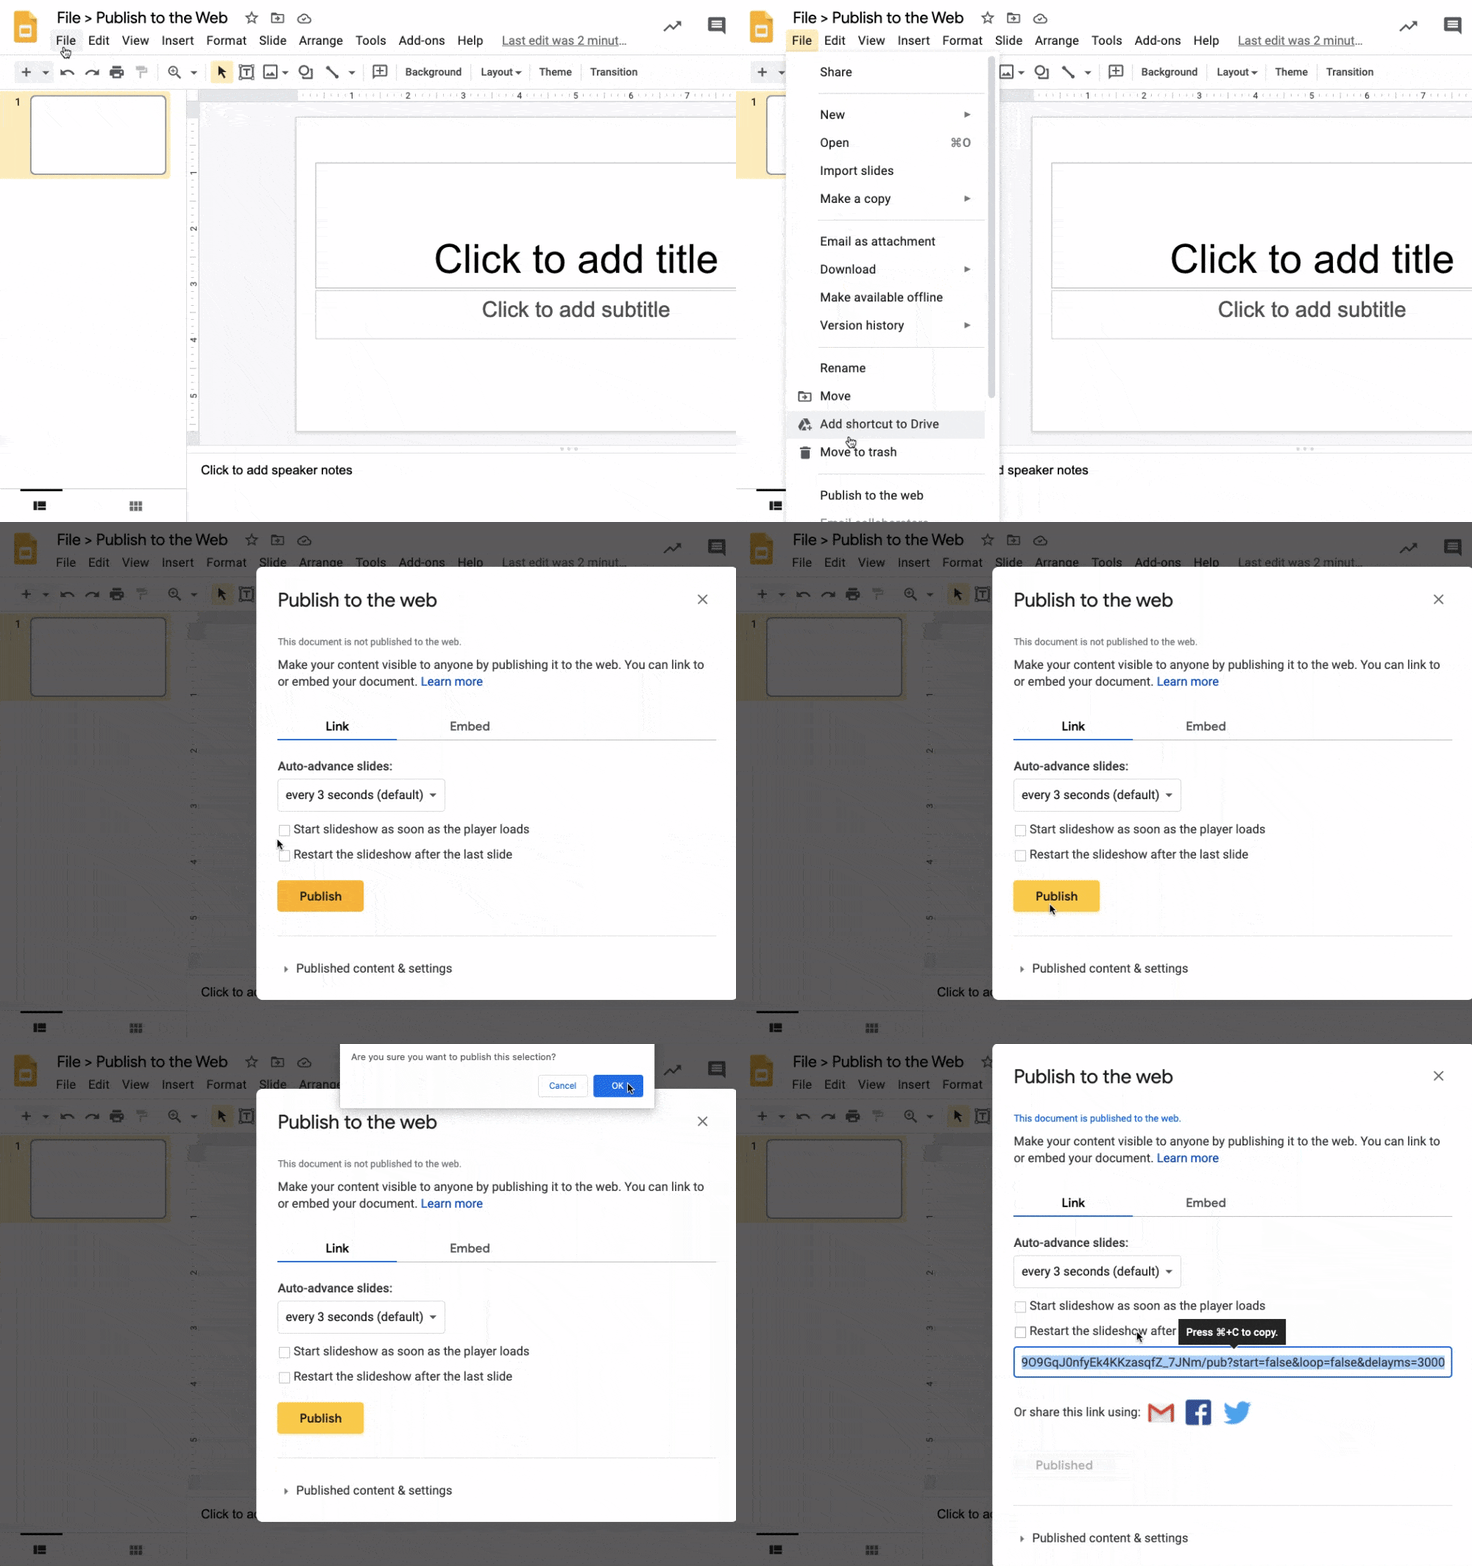
- Go to File>Publish to the Web.
- Click the Publish button.
- Confirm and click OK.
- Then copy and paste the link in a brand new window, not a new tab, open a new window. This gives you a full window player of your slides that you can select when you share your screen, allowing you to keep both the window with the Google Meet or Zoom and the presentation open.
Want students to have this special published link? DON’T attach in Google Classroom!
Google Classroom will override the link and share it. Instead of attaching, add the link to the instructions or in the comments!
Here’s a video to walk you through the process:
Related: 10 Google Classroom Tips for Remote Learning
#2 Chrome Tip: Tab Scissors and Tab Glue to Split Screen
Many teachers are requesting additional monitors and screens to help give them a better view of everything all at once during remote learning sessions.
Unfortunately, we don’t all have the luxury of additional screens, so we need to use the real estate we have and split our screens.
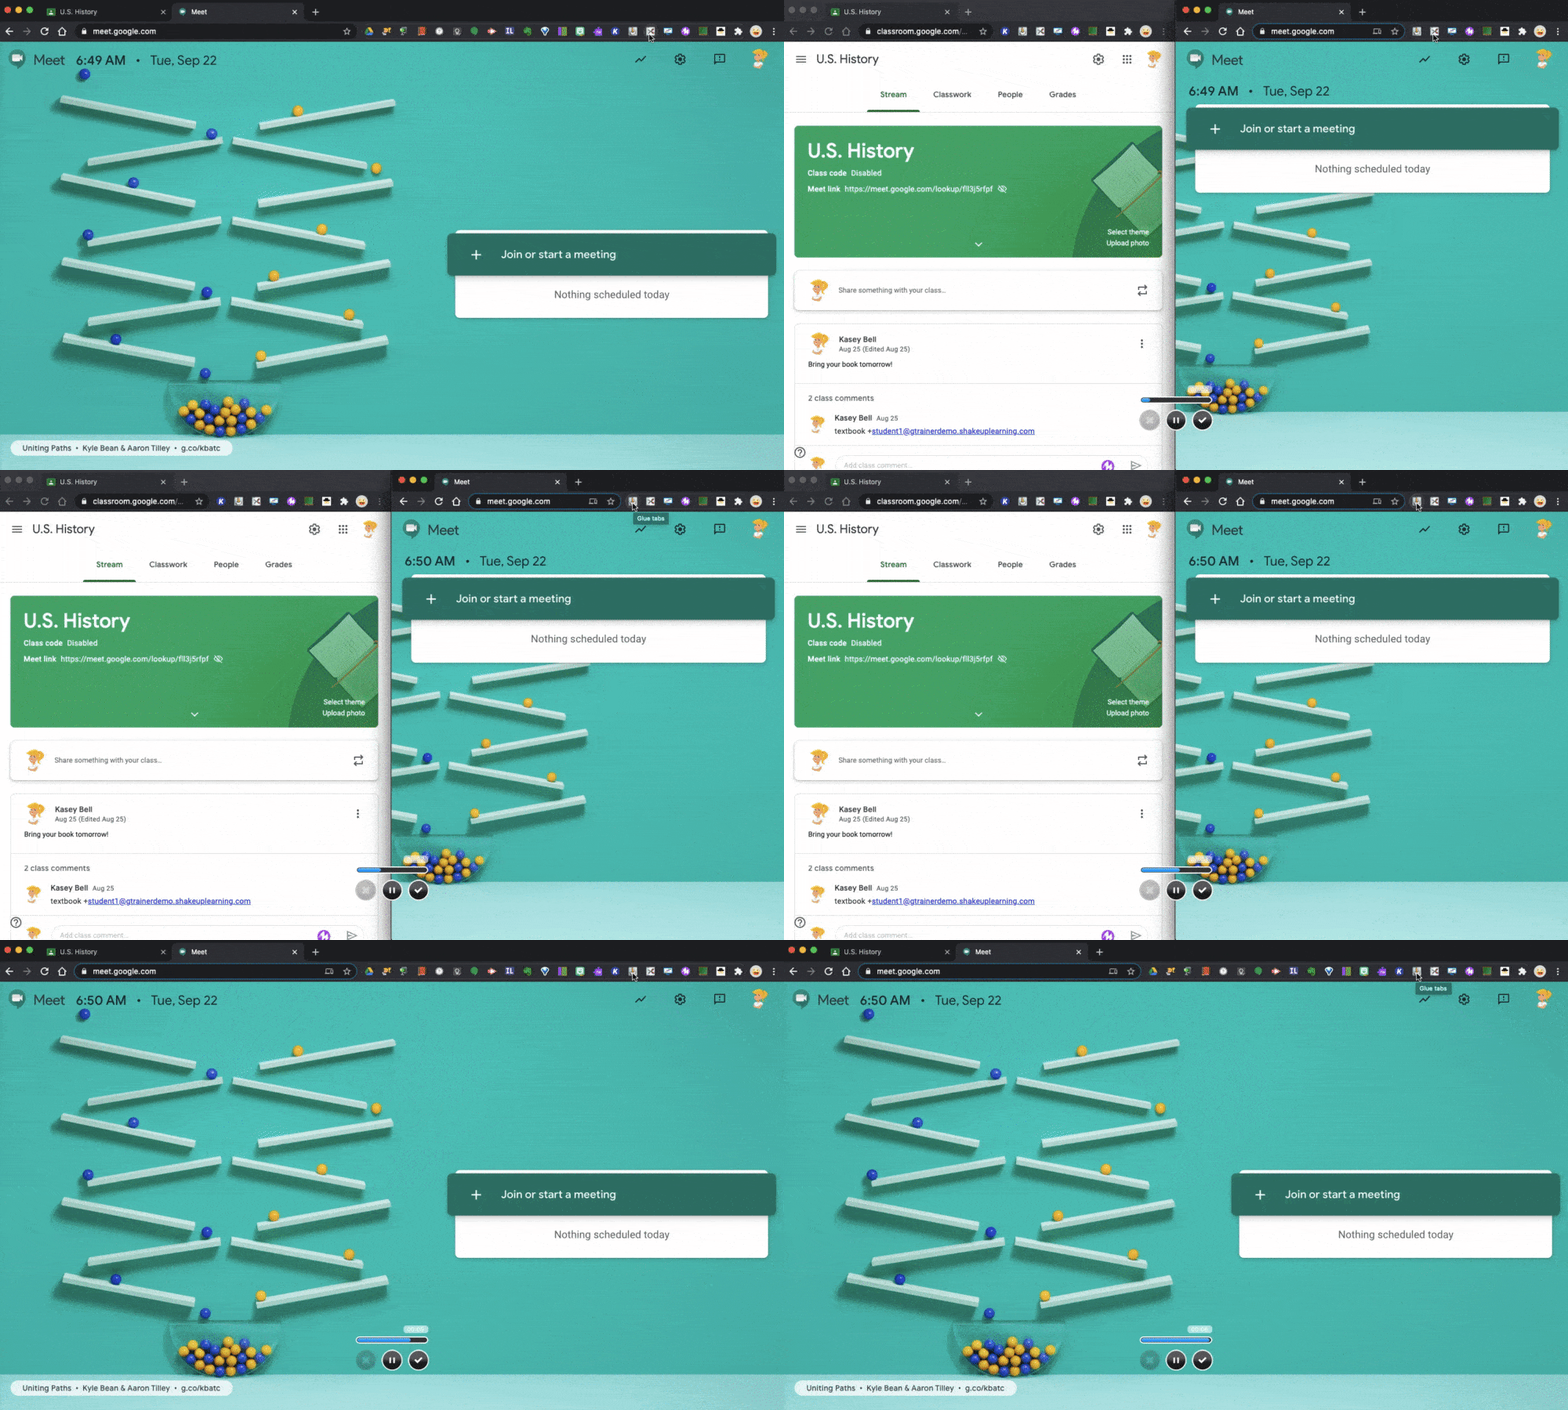
My most used Chrome extensions are Tab Scissors (split your tabs into separate windows), and Tab Glue (glues the windows back together again). These two extensions are super handy when managing multiple windows and screens during remote learning.
Use these extensions to split your screen to see:
- Google Classroom and student work side-by-side
- Google Classroom and Google Meet side-by-side
- Google Classroom and your grade book side-by-side
- whatever you need to view side-by-side in your browser!
Related: 5 Google Chrome Extensions That Make Google Classroom Even Better!
#3 Chrome Tip: Sir Links-a-Lot Extension
There are so many different ways to share Google files and special links. It can get kind of confusing.
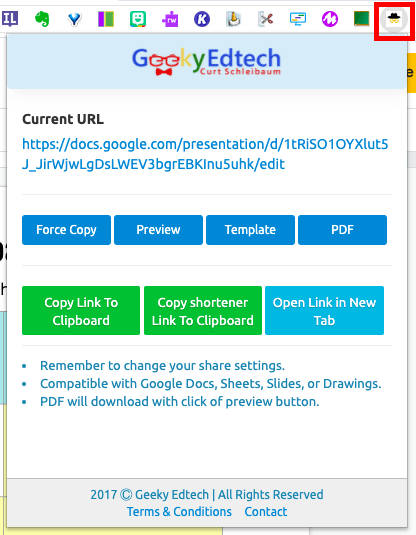
The Sir Links-a-Lot Chrome Extension can be tremendously helpful. With one click, you can quickly grab the link you need.
Related: Create G Suite Templates with This Mind-Blowing Hack and How to Force a Copy of Google Docs
#4 Google Meet Tip: Cast to Your TV as an Extra Screen
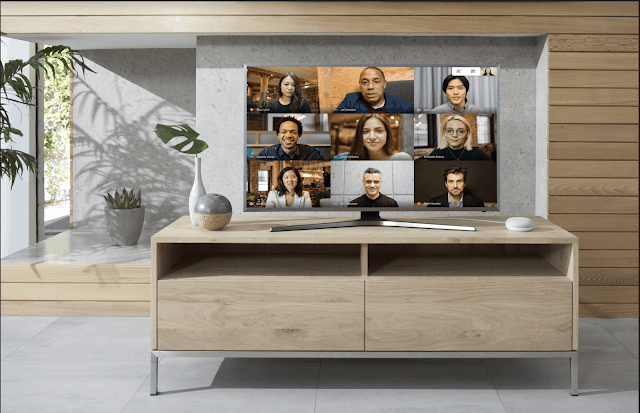
Speaking of extra screens, did you know you can cast your Google Meet onto your TV at home and use that as an extra monitor?
You need a Google Chromecast or Chromecast-enabled TV for this particular method to work. Depending on your TV type and age, there may also be ways to set it up as an additional monitor for your computer.
Visit the Google Support Center for step-by-step directions for your device.
Related: How to Integrate Google Classroom and Google Meet
#5 Drive Tip: Use the Activity Dashboard to Monitor Student Activity
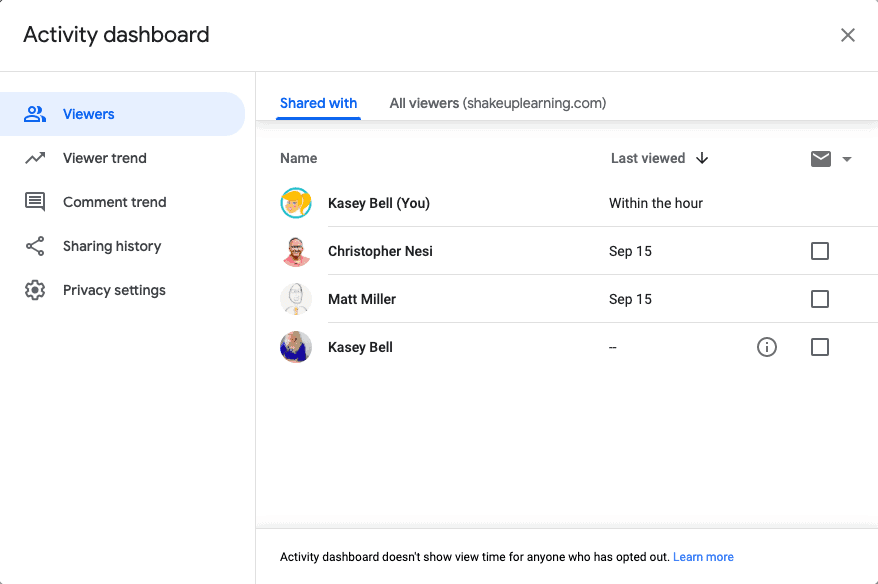
The activity dashboard allows you to view file activity. (Note: your G Suite Admin must enable this.)
File activity includes the names of users who have viewed Google Docs, Sheets, and Slides files and the time they viewed them. This will allow you to see if students have viewed files. (It’s not super detailed, but it’s better than nothing!)
To view the Activity dashboard for a file, users must have Edit access to the file, and they must be in the same domain as the file owner. Users can’t view the Activity dashboard for files outside their domain.
There are several places where you can view the activity for Google Docs, Google Sheets, Slides, and Drawings.
- You’ll see the Activity dashboard icon (a jagged arrow pointing upward) next to the comments button in the upper right-hand corner of the page.
- You can alternatively click on Tools > Activity Dashboard.
- You can also view activity inside Google Drive by selecting the file and clicking the View Details icon (looks like an “i” inside a circle.)
#6 Google Meet Tip: Collaborate in Jamboard
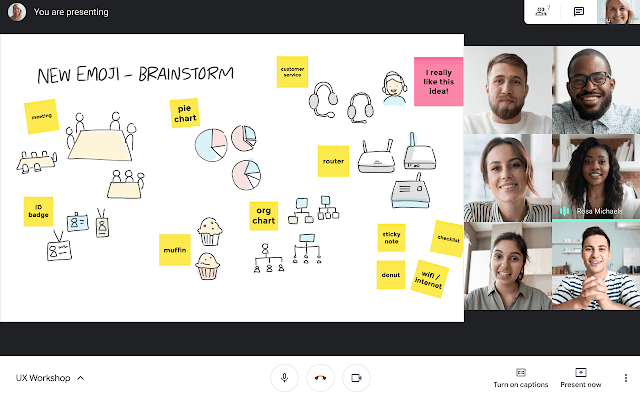
Google Meet and Jamboard are now integrated! Use a collaborative whiteboard with Jamboard in Google Meet, so you can encourage students to share ideas and try creative approaches to lessons.
You’ll also be able to save, share, and continue the whiteboard at any time with Jamboard.
Note, you can only start or open a Jamboard during a Meet call if you joined the call on a computer. Video call participants on a mobile device or tablet will get a link to a Jamboard file and be directed to the Jamboard app.
#7 Google Classroom Tip: Call on a Random Student (mobile)
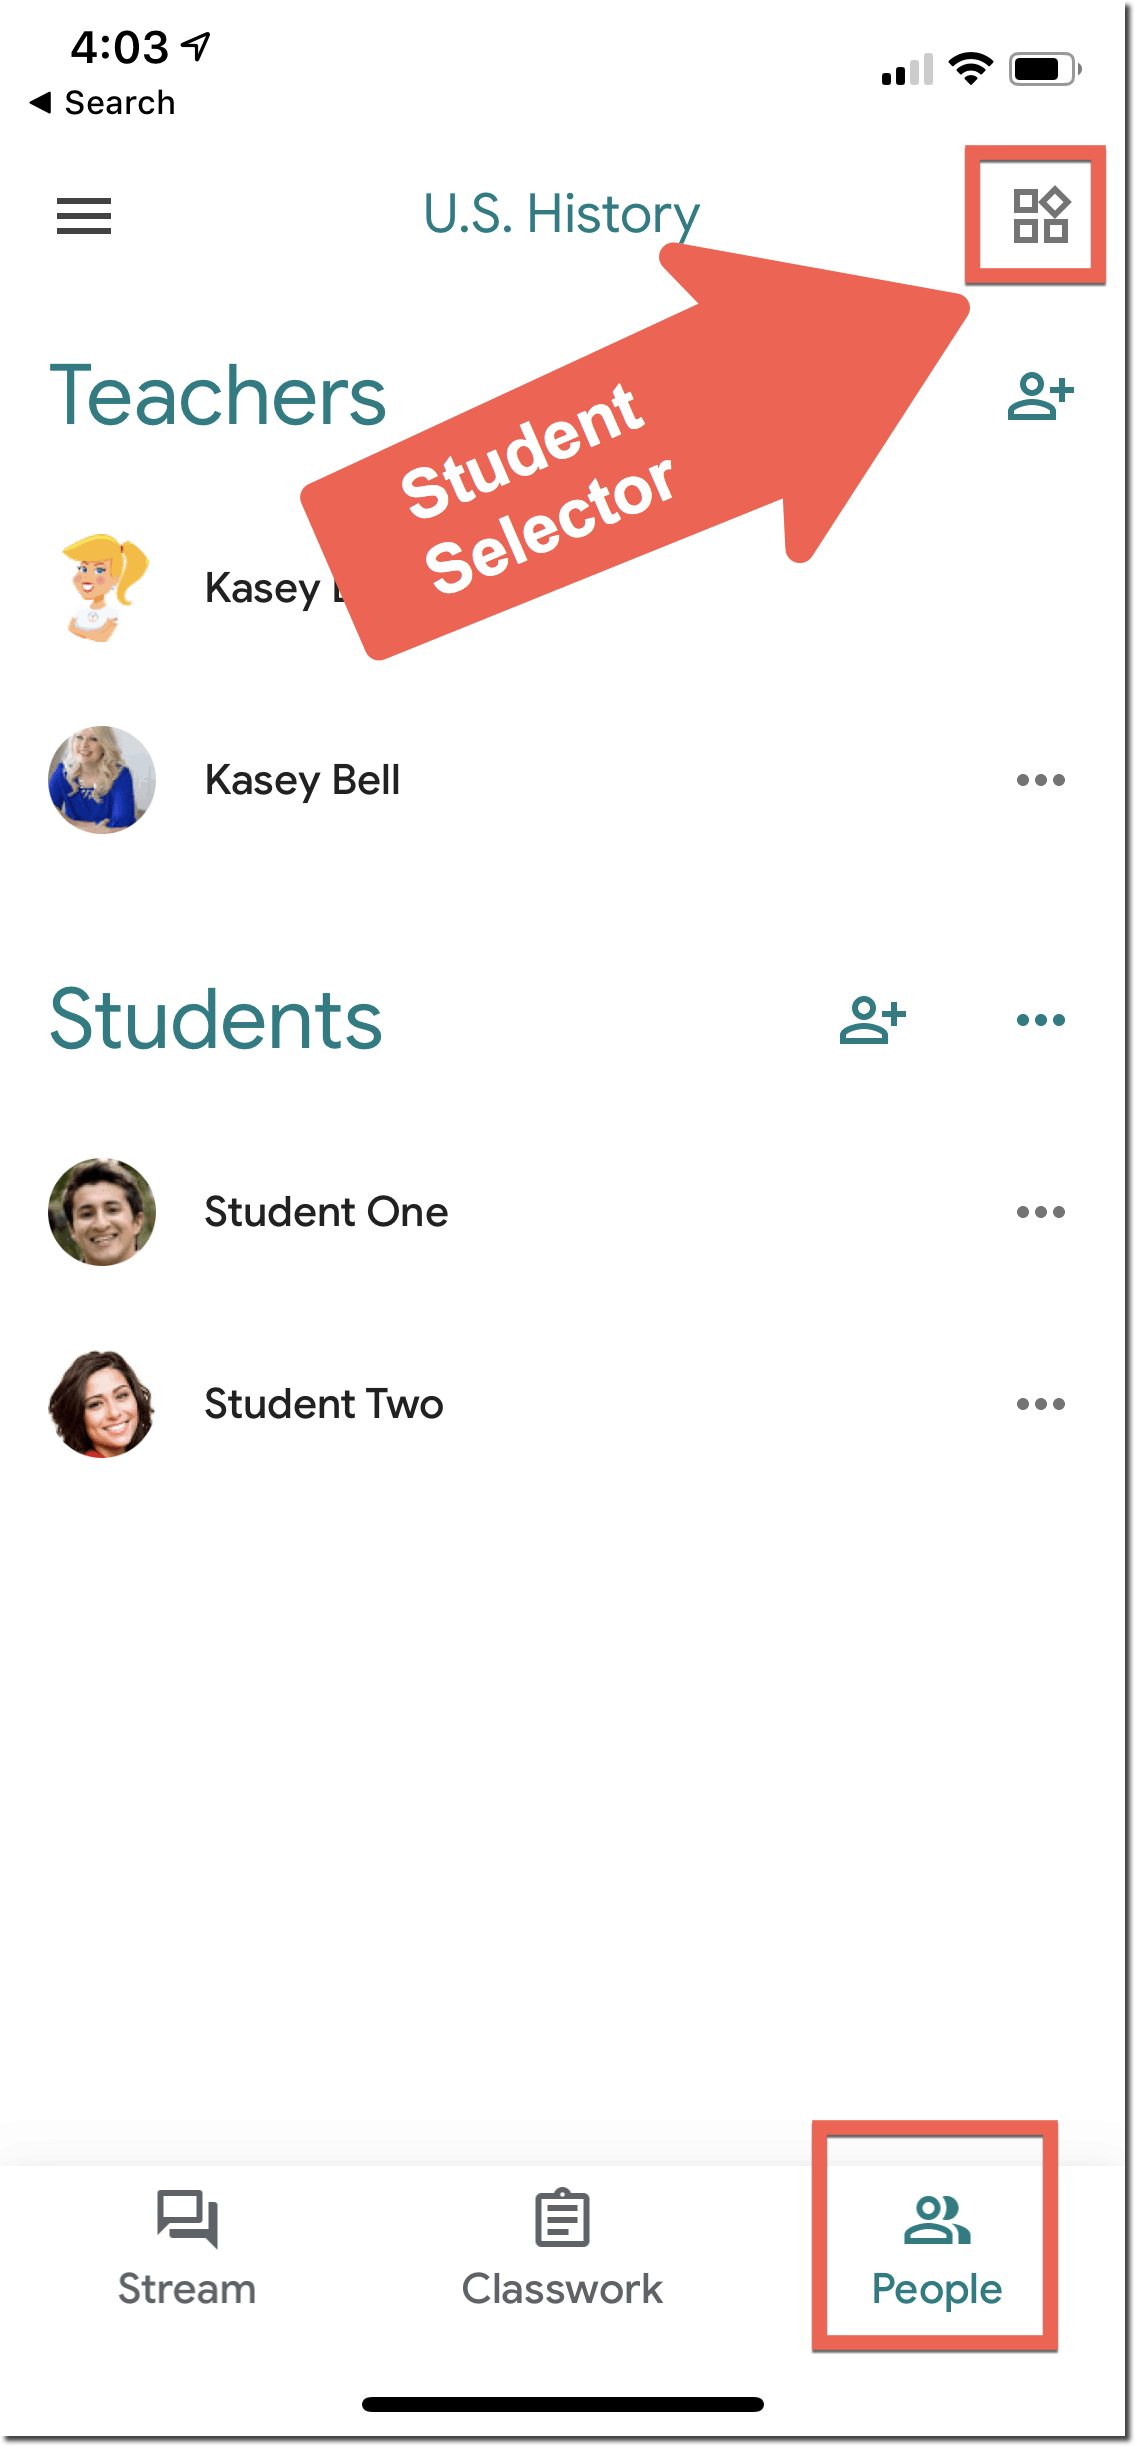
The Google Classroom mobile app has a few features that you won’t find on the desktop version. One feature is the ability to randomly select a student’s name from your roster.
Again, this is ONLY available in the mobile app.
The student selector allows you to randomly select a student from your class roster. This is a great way to fairly call upon students during class.
Go to the “People” section then click on the icon near the top-right.
Learn more about the Student Selector here.
Keep your phone handy during your remote learning lessons and use this feature to help you select students to call on.
Related: 10 Google Classroom Tips You Didn’t Know
#8 Chrome Tip: Save and Open All Your Websites at Once
I love using Google Chrome and having tabs open on start up. But there are also certain activities that require teachers to open several websites, especially during remote learning. For instance, you may have a few websites that you open every time you start a live lesson on Google Meet, like Google Classroom, the lesson Google slide deck, and your Google Meet.
If you find yourself visiting websites frequently, you probably have them bookmarked. But did you know you can save a folder of bookmarks and tell Chrome to open them all at once?
- First, enable your bookmarks bar. (This is the bar that appears below you search box and extensions.) Go to 3 dots > bookmarks, and make sure “Show Bookmarks Bar” is enabled and has a checkmark next to it.
- Right-click (or control-click) anywhere on the bookmarks bar and select “Add Folder.”
- Name your folder and click “Save.”
- Now you can click and drag your bookmarks into the folder.
- To open all the websites in the folder at once: right-click on the folder (or control-click) and select “Open All.” You can choose to have these open in the current window, a new window, or incognito.
Related: Back to School with Google Chrome
#9 Learn How to Search Google Drive
One of the most useful skills for teachers and students who are storing the majority of their files in Google Drive is learning how to search Drive!
As teachers, we can accumulate A LOT of files. And oftentimes, we need to find things fast.
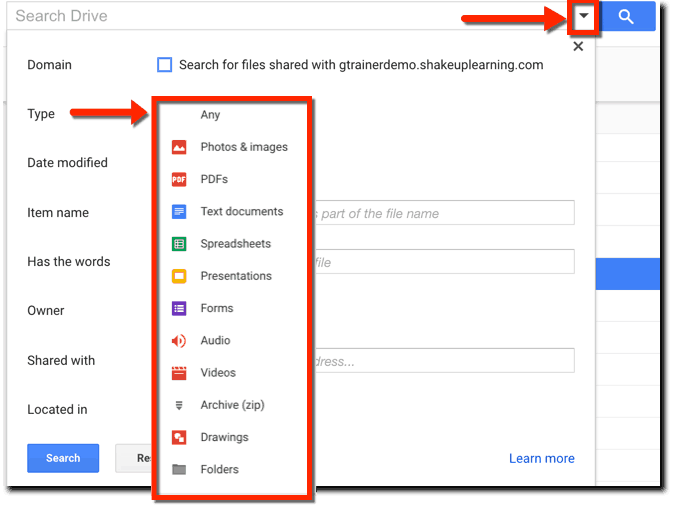
Take the time to learn how to use the advanced search in Google Drive by clicking the search box’s down arrow.
I have an entire post to help you better understand Google Drive’s search. CLICK HERE for 8 Ways to Find Anything in Google Drive.
#10 Voice Typing in Google Docs
One tiny little feature that packs an amazing punch is Voice Typing in Google Docs. This is a speech-to-text feature that is built into the most popular word processor in the world, and it is available to you and your students if you have a microphone in your devices.
You can dictate all kinds of words, lists, and writing into Google Docs. You can also dictate formatting, punctuation, and editing. But wait…there’s more! YOU CAN DICTATE IN OTHER LANGUAGES!!!!! WHOA!!!!
Step 1: Turn on Your Microphone
To use voice typing or voice commands, your computer microphone needs to be on and working.
Step 2: Start voice typing in a document
- Check that your microphone works.
- Open a document in Google Docs with a Chrome browser.
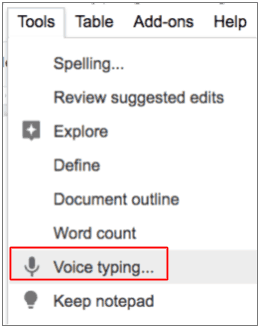
- Click Tools
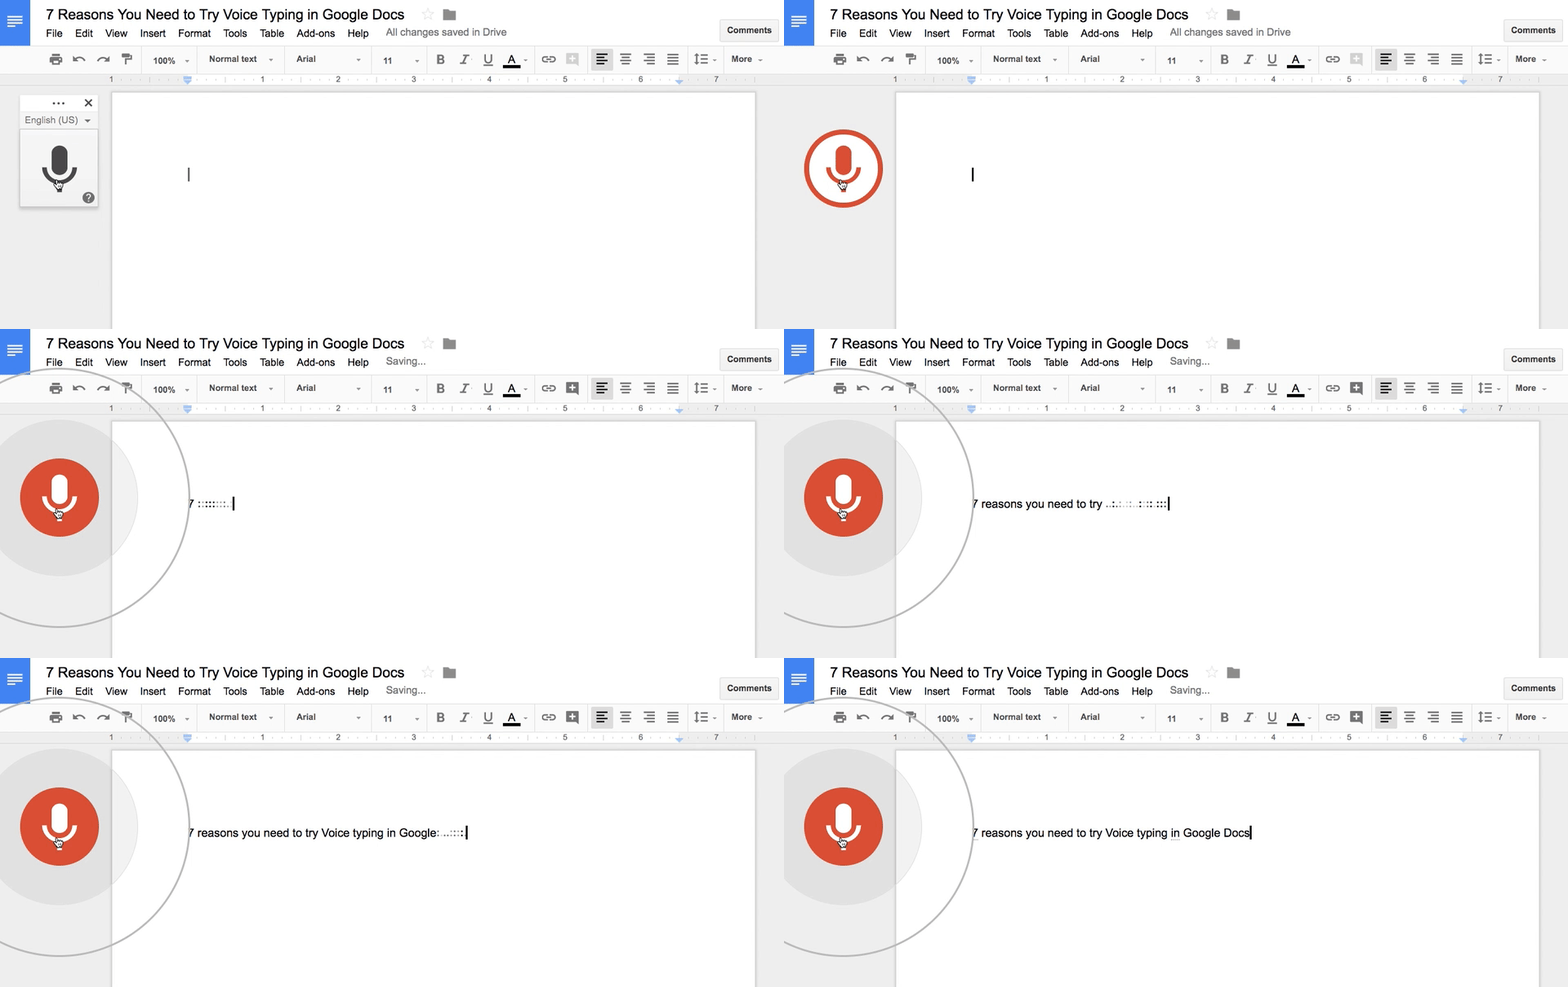
Voice typing. A microphone box appears.
- When you’re ready to speak, click the microphone.
- Speak clearly, at a normal volume and pace (see below for more information on using punctuation).
- When you’re done, click the microphone again.
This tool is super handy for teachers and students. Don’t miss the entire post: 7 Reasons You Need to Try Voice Typing in Google Docs.
Podcast Question of the Week:
- How have Google tools helped your students connect and learn this year?
- Post your answers in the Shake Up Learning Community or on your favorite social platform.
Join our FREE Shake Up Learning Facebook group.
© Shake Up Learning 2023. Unauthorized use and/or duplication of this material without express and written permission from this blog’s author and/or owner is strictly prohibited. Excerpts and links may be used, provided that full and clear credit is given to Kasey Bell and Shake Up Learning with appropriate and specific direction to the original content on ShakeUpLearning.com. See: Copyright Policy.
