In this episode, I am sharing some must-have Google skills for two of the most used Google  applications, Google Docs and Google Slides!
Better yet, most of these skills will transfer to other applications as well.
Learn how to make the most of Google, save time, and learn some best practices to help you thrive with Google!
This is Part 4 of a 4-part series on Must-Have Google Skills for Teachers.
You don’t want to miss Part 1, Part 2, or Part 3!
This episode is sponsored by Schoolytics.
Schoolytics helps you measure, monitor, and manage student engagement and assignments. It also organizes all the student engagement data from Google Classroom in one easy-to-use dashboard. And my favorite part? Schoolytics is free for teachers!
Visit: schoolytics.io to sign up!
Listen to this article.
![]()
![]()
![]()
![]()
Shoutout
Thank you to Kelly Bell (no relation) for sharing her love of Blended Learning with Google on Instagram! Be sure to check out Kelly on e67 of the podcast!
Quick Tip of the Week (Use Custom Colors in Google Projects)
Do you ever get frustrated trying to find the exact color for your fonts, background, or other objects in your Google projects? Try the eyedropper Chrome extension to grab the exact color code and use it in your Google projects in Docs, Slides, Sheets, Drawings, and more!
📺 Watch this quick video to learn how!
Subscribe to Shake Up Learning on YouTube
Must-Have Google Docs and Slides Skills for Teachers
Today, I am sharing some MUST-HAVE skills for teachers that use Google Docs and Slides. But I also have to mention that most of these skills will transfer to other applications in the Google suite as well.
Google Docs and Google Slides are probably the two most-used applications, so they definitely needed to be included on my must-have skills list!
Once you learn how to do something in one Google application, it often transfers to other applications.
Create a New Google Doc or Slide Deck
There are many ways to create a new Google file.
One way is to go to the homepage for that application:
- Docs Homepage: docs.google.com
- Slides Homepage: slides.google.com
- Sheets Homepage: sheets.google.com
- Forms Homepage: forms.google.com
- Jamboard Homepage: jamboard.google.com
- Sites Homepage: sites.google.com
Do you see a pattern?
From the homepage, you can start with a blank doc or select one of the handy templates. (Note: Drawings doesn’t have a homepage. If you go to drawings.google.com, it will automatically create a new Google Drawing.
In Part 3, I mentioned how to create a new file from Google Drive, and I shared a quick URL trick that is worth repeating (see video below)!
Page Setup in Docs & Slides
Page setup is a must-have skill for Google Docs and Google Slides.
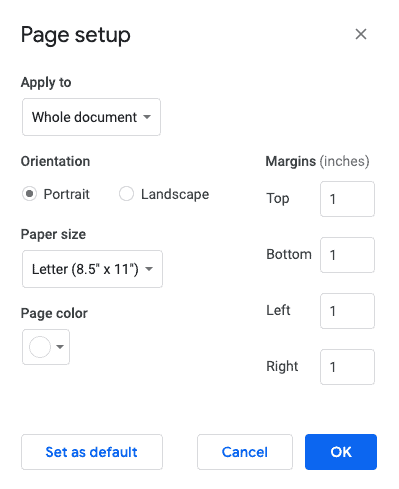
Google Docs Page Setup
When you are creating a document in Google Docs, you need to be able to set up the page to work with your content or project. You may need to switch to landscape, change the margins, page color, or paper size.
In your Doc, go to File > Page Set Up.
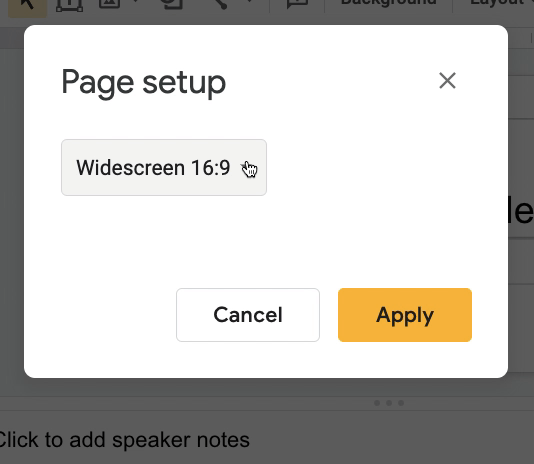
Google Slides Page Setup
Even though we don’t typically think of slides as “pages,” the steps are the same. You can customize the size of your slides into anything you want! Changing the size opens up many more possibilities for using Slides as a creation tool.
Related: 25 Things You Didn’t Know Google Slides Could Do!
Customize the Size of Your Slides
In your Slides, go to File > Page Set Up
From the dropdown, choose “Custom.”
Make the slides any size you want:
- Inches
- Centimeters
- Points
- Pixels
(Note: the size will apply to ALL slides.)
Sharing Docs & Slides
Look for the “Share” button near the top right in Docs and Slides to share and collaborate in Docs and Slides.
![]()
Collaboration is the NUMBER ONE reason to use Google, and a MUST-HAVE skill for teachers and students.
From here, you can invite collaborators or make the file accessible with a link.
To learn more about sharing, watch the video below.
Make a Copy
Hands-down, one of the most important skills for ANY Google user is to know how to make a copy!
Most of the time, if you have the right to view a file, you have the option to make a copy and save it to your Drive. This way, you can edit the file and make it your own.
I shared how to make a copy from Google Drive in Part 3, but let’s look at it inside the application.
How to Make a Copy of Docs, Slides, Sheets, or Drawings,
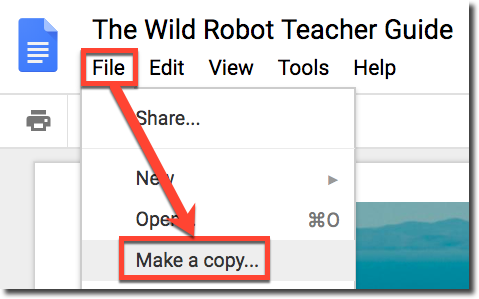 STEP 1: Open the file (Google Doc, Slide, Drawing, or Sheet) in your browser (Chrome is recommended).
STEP 2: Go to the FILE menu and select MAKE A COPY.
STEP 3: A small popup will prompt you to name your new copy and give you the option to organize it in one of your Google Drive folders. Click on the folder to select a different folder or create a new folder.
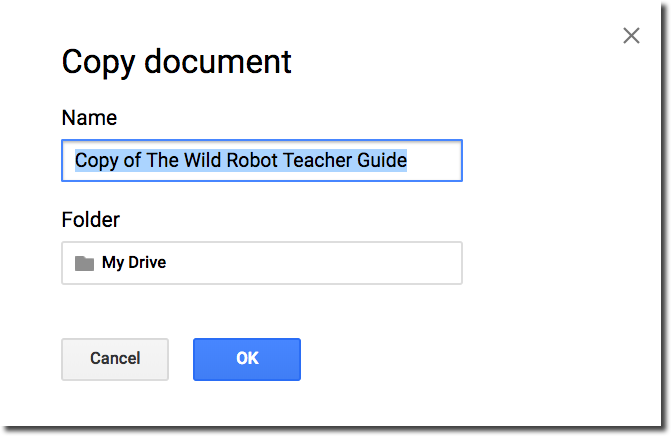
Note: If you are copying your own document, you will also see two checkboxes. (1) Share it with the same people, which will automatically share the new copy with the same people, and (2) Copy comments, which will automatically copy all of the comments from the original document to the new file.
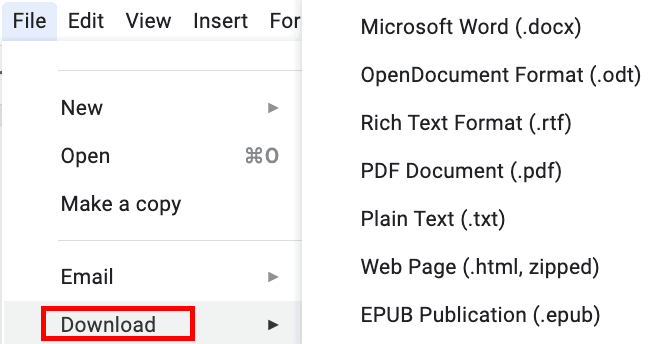
Download Files
Most Google applications, including Docs and Slides, allow you to download as different file types. This is super handy!
Think of this as CONVERTING to a different file type.
Download in Docs
In Docs, the most common conversions are .docx and .pdf–the most universally accepted file format in the world.
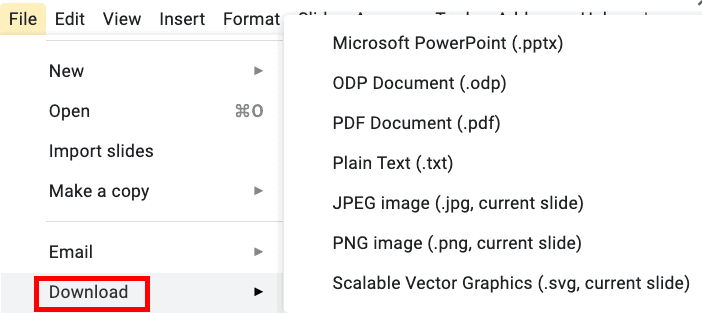
Download in Slides
In Slides, the most common conversions are .pptx, .pdf, .jpeg, and .png. Those last two are image formats, meaning that you can convert a slide into an image and use it wherever you use images.
Insert and Edit images
One particular skill that all teachers and students need to learn is how to insert and edit images in Docs and Slides.
Insert Images in Docs and Slides
Go to Insert > Image, and you will see all the options for inserting images into Google Docs and Slides. Again, this skill transfers to other Google applications where you will see similar options for inserting images.
- Upload an image that is saved on your computer
- Search the web for images (This opens in a sidebar inside the application. Great for students!)
- Insert an image that is saved in your Google Drive.
- Insert an image from your Google Photos.
- Insert an image by URL–a unique image address that you can copy and paste.
- Or, use the webcam on your device to insert by camera.

Editing Images in Docs and Slides
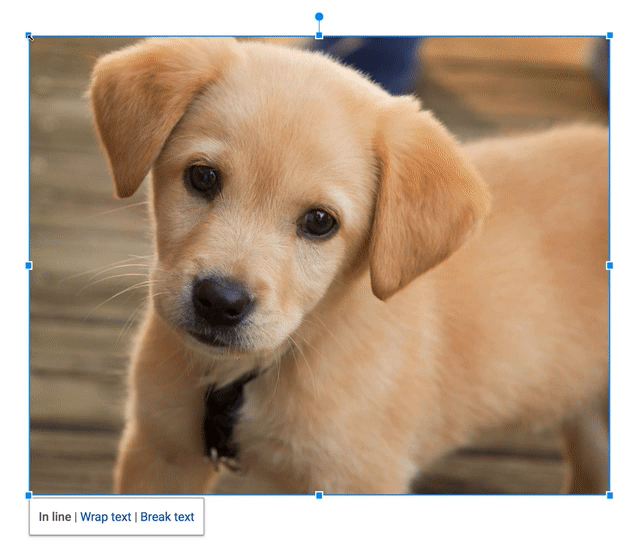
Once you have inserted an image, you also have several image editing options.
Resizing Images
You can easily resize images by selecting the image and clicking and dragging the blue “handles” until you have the desired size.
To keep the proportion ratio, hold the SHIFT key as you click and drag. This will keep the image from looking out of proportion.
Cropping Images
Related: 10 Google Docs Tips Every Teacher Should Know
Masking Images
Insert Video in Google Slides
One feature that is ONLY available in Google Slides is the ability to insert a video from Google Drive or YouTube.
To insert a video in Slides, go to Insert > Video.
Then you can search YouTube for your video, copy and paste a link to a YouTube video, or bring in a video that is saved in your Google Drive.
Once you have inserted a video, you will have some video formatting options that pop up in a sidebar to the right.
To learn more about video formatting options, check out this post: 4 Video Formatting Options That Will Make Your Day.
Insert a Comment
The comment feature is available in most Google applications and is definitely a must-have skill for teachers in students.
Comments usually appear on the right side of the document or file.
Comments are great for teacher feedback, peer feedback, and other communication and collaboration.
There are several ways to insert a comment:
- Inside the application (Docs, Slides, Sheets, Drawings), go to Insert > Comment.
- Click on the comment button near the top right (next to the share button), then click the plus sign to add a comment.
- In Docs, you can hover over the edge of the page, and you will see an icon to click to add a comment.
- Or, just use the keyboard shortcut (Control + Alt +M).
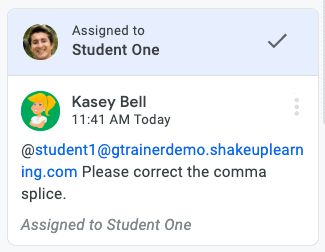
Tag People (or Students) in Comments
Not only can you comment to leave feedback for students or collaborating with other educators, but you can also “tag” people in the comments, so it’s clear that the comment is meant for them.
To mention someone in a comment, type the “@” symbol and type their email address.
Once the user is found, you can check a box to assign that person a task.
If they have email enabled, they will get an email notification that they have been tagged in a comment.
Related: Tag Students in Comments in Google Classroom
Insert Links
Another skill that will transfer across many Google applications is inserting a link.
To insert a link, highlight the text or object you wish to link. Then try one of the following methods:
- Inside Docs, Sheets, Slides, Drawings, go to Insert > Link.
- Or, click on the link icon in the toolbar.
- Or, try the keyboard shortcut “Control + K.”
By the way, that keyboard shortcut works in many other applications outside of Google. Super handy!
WHEW! That was a lot of info! Don’t miss the other parts in this series!
- Part 1: MUST-HAVE Chrome/Chromebook Skills
- Part 2: MUST-HAVE Google Classroom Skills
- Part 3: MUST-HAVE Google Drive Skills
© Shake Up Learning 2023. Unauthorized use and/or duplication of this material without express and written permission from this blog’s author and/or owner is strictly prohibited. Excerpts and links may be used, provided that full and clear credit is given to Kasey Bell and Shake Up Learning with appropriate and specific direction to the original content on ShakeUpLearning.com. See: Copyright Policy.