Goal Setting with Student-Created Vision Boards in Google Slides!
A great idea for a new year! Student-Created Vision Boards with Google Slides! A student-created vision board is a great way to help students set goals and visualize reaching them! We often use the start of a new year, new school year, or new semester to set goals, personal and professional. Visualization is one of the most powerful exercises for the mind and for reaching your goals. Let’s take advantage of this fantastic strategy with students.

A vision board is a collection of images and words that represent the things you want in life–the things you want to do, the things you want to learn, the things you want to be. I create a vision board for myself each year, and I got to thinking about how valuable this experience could be for our students.
Often, vision boards are not digital, they are hands-on creations, cutting images from magazines, and gluing it together on posterboard. While this is fun and tangible, it may not be as classroom-friendly.
The Digital Vision Board
You can create digital versions of vision boards using the tools of your choice. Google Slides or Google Drawings stand out as obvious choices when it comes to G Suite. I created an example using Google Slides and the Unsplash photos add-on to show how easy this activity can be. Of course, a digital version allows you to carry it with you wherever you go and regularly reflect on your progress.
Why Vision Boards?
Vision boards are nothing new, but they may be new to students and your classroom. Over the past few years, vision boards have been featured on TV shows such as Oprah and Ellen. Visualization can be a powerful mind-body connection in helping you stay focused on your goals. Let’s leverage visualization for LEARNING!
“A goal without a plan is just a wish.”― Antoine de Saint-Exupéry
Vision boards also support Dynamic Learning and the ISTE Standards for Students! This is just one small way we can empower learners in our classrooms this year.
Through the Dynamic Learning model and framework, I shared some ways to go BEYOND, including a mindset to take learning BEYOND the BELL. One strategy to go BEYOND the BELL is to have students set their own learning goals. Help students write their own learning goals, both goals aligned to what they are learning in class, but also BEYOND. What problems would they like to solve? What’s something they’ve always wanted to learn?

credit: LifeHack.org
Creating Digital Vision Boards with Students
I think this is an activity that just about any student could produce. However, I would recommend this for grades 3 and up.
STEP 1:
Have students brainstorm their goals, both personal and academic. Give them good, guiding questions to help them imagine the end of the semester or school year and the things they hope to accomplish by that time.
You will need to help them understand the difference between unrealistic dreams (becoming King of England) and a realistic goal (reading two chapter books). But don’t stifle the dreams in the process, just help them visualize all kinds of things for themselves.
– What have you always wanted to learn?
– Picture yourself at the end of the school year. What does it look like? What did you accomplish?
– What books do you want to read?
– What problems do you want to solve?
– What’s something you struggle with that you would like to overcome?
– What’s something you would like to learn in this class?.
Help students brainstorm a list of ten or more ideas. Then have students reduce that list to their top five or six. This could quickly get to be a long list and an even longer activity. Help students stay focused and to generate a good list of personal and academic goals. Three of each would be an excellent place to start. I would also suggest showing lots of examples, even creating one for yourself so your students can see the possibilities.
STEP 2:
Create your vision boards in Google Slides! As I mentioned earlier, you could also do this in Drawings, but I think the new add-ons for Slides gives it the edge.
Add Images
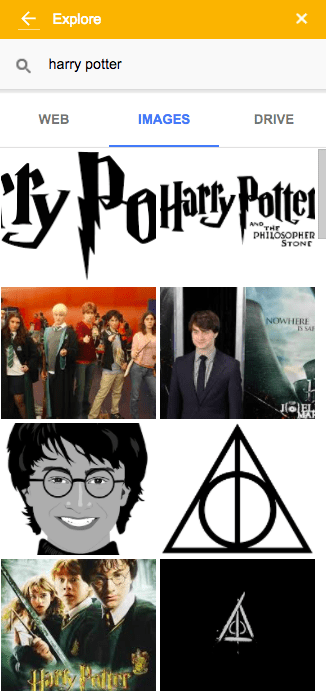
– Add images from the Explore tool. Go to Tools>Explore and search. Click on Images, then just click-and-drag into the project. (Note: Click on the image to open and view usage rights. It will appear very small below the image.)
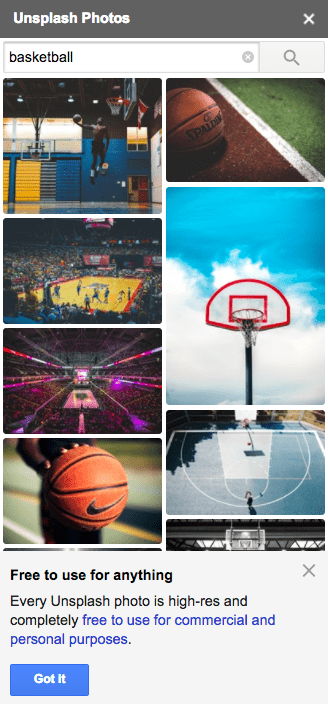
– Add images and icons using the Unsplash Add-On and the Icons by Noun Project Add-On. BOTH ARE FREE, but Icons requires attribution. (Note: Add-Ons do NOT work on mobile devices.)
– Add words, text, shapes, lines, arrows, emoji, even GIFs…WHATEVER! (I would encourage you not to add video. GIFs could even get out of hand. Remember, you want this to be something they can glance at and visualize in less than a minute.)
Vision boards can take many forms; some are organized, some are chaotic, some are organized chaos. Check out this post from LifeHack for some fresh ideas.
Encourage originality and creativity! You don’t want these to be cookie cutter; these should be very personalized!
Although the focus of this post is a digital vision board, you can easily go old school with this and get out the scissors, glue, poster board, and magazines. If you do this, take a picture of each vision board so students can save to their Google Drive.
Google Slides Tips and Tricks:
- Add some pizazz with image editing tips and tricks in Google Slides
- Cropping and masking images into shapes
- Insert shapes, lines, and word art
- Add-ons
Other Ideas to Spice Up the Boards:
– Use one collaborative slide deck for the entire class and have students comment on each other. (Note: You may want them to create independently first, so they aren’t all choosing the same goals and images.)
– Sprinkle some Bitmoji fun in there! (where age appropriate)
– Even add emojis!
– Use Flipgrid for reflection and periodic goal reviews (every 6-9 weeks)
– Share with the world! I would love to see these! Tag me on Twitter or Instagram @ShakeUpLearning.
STEP 3:
Save the vision boards in a shared folder in Google Drive, or if students are okay with it, publish the slide deck on a webpage or Google Site. You can keep it in the slide deck, or students could download their board as an image file (File>download as> png or jpeg.) They could save this image as the background on their personal device!
The key is to have it somewhere handy, so you can review your goals periodically throughout the year.
STEP 4:
Review and track goals! Review your vision boards periodically. The timing is up to you as the teacher and what works for your classroom. Secondary students could also write out their goals in Google Keep and track their progress. Reflection, discussion, and review will make this a precious experience for students of all ages.
What do you think? Will you try vision boards this year? Leave me a comment and share your thoughts! Love to see links to vision boards!
Want more Google Slides Ideas?
Join the Google SLIDES Master Class Online Course
I frequently refer to Google Slides as the Swiss Army Knife of the G Suite tools because it is capable of being so much more than a presentation tool. In this course, you will learn how to use Slides in new and unexpected ways in your classroom that will engage your students and make learning more dynamic!
K-12 teachers are going to LOVE THIS COURSE!
This class is perfect for beginner to intermediate users to take their skills to the next level and become a Google Slides Master!
(Prerequisite: basic knowledge of slides, how to access and create new slides.)
Click here to learn more and to ENROLL TODAY!
Learn All About the Course
What’s Included?
- Self-paced
- Video-based lessons
- 3 BONUS Lessons!!!
- Bonus 1: Stop-Motion Animation
- Bonus 2: How to Create Magnetic Poetry with Slides and Drawings
- Bonus 3: 50 Google Slides Lesson and Project Ideas
- Supporting Resources
- Best Practices and Tips
- 6 hours of professional learning credit
- Purchase orders are accepted (Just email Kasey[at]ShakeUpLearning.com (replace [at] with @.)
- Bulk license discounts
- Get your whole team, campus, or district on board
Click here to learn more and to ENROLL TODAY!
Check out all of my Google Slides Resources here!
© Shake Up Learning 2025. Unauthorized use and/or duplication of this material without express and written permission from this blog’s author and/or owner is strictly prohibited. Excerpts and links may be used, provided that full and clear credit is given to Kasey Bell and Shake Up Learning with appropriate and specific direction to the original content on ShakeUpLearning.com. See: Copyright Policy.
I will be using this in my classes this week. I love the idea of using technology to create rather than 2 D with magazines and paper. Thanks for the timely post.
use of Technology is great medium for advance learning…its like Virtual reality ..dreaming with open eyes
for latest VR products please visit https://vrboxprices.com/
here you can buy amazing Vr products on decent discounts.