 Lessons Learned from a Google Expeditions Pilot

Below are 8 Tips for a Google Expeditions Pilot from Heather Kilgore, an Instructional Technology Coordinator for Commerce ISD in Commerce, Texas, where she shares the lessons learned from their Google Expeditions pilot program. As we all begin to find ways to bring Google Expeditions, Google Cardboard, and other virtual reality experiences to our classrooms, I thought it was important to share this first-hand experience with you. The first time we try anything, we always learn a lot of lessons!
Download The Infographic
We also put these tips into an infographic that you can download here (PDF).
This is a guest post written by Heather Kilgore.
The Spark: The Google Expeditions Explorer Program
My name is Heather Kilgore, and I am the Instructional Technology Coordinator for Commerce ISD in Commerce, Texas. One of my passions is bringing the latest and greatest in educational technology to the teachers and students in my district. This is what led to our venture into the world of Google Expeditions. I was scrolling through my Twitter feed one day when I noticed a local school district Tweeting pictures of their students using the cardboard devices in the Explorer Program. Virtual reality had intrigued me, but I couldn’t grasp the classroom connection until I saw what Google was piloting. I knew that the students of Commerce ISD needed to experience this!
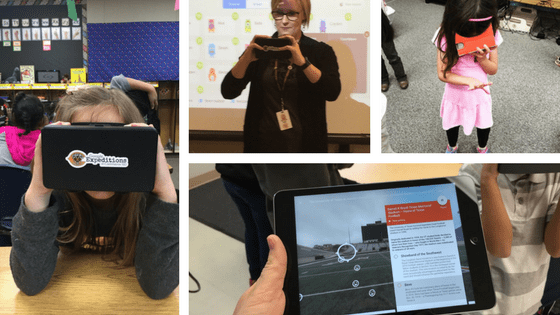
Our Commerce ISD Google Expeditions adventure began in the spring of 2016 when the Google Expeditions Explorer Program came to Commerce Elementary School. When I saw this student reaching out to touch the fish and the coral in her scene, I knew that this was something that all of our students needed to experience!
[Tweet “8 Tips for a #GoogleExpeditions Pilot by @TechyKilgore #SUL #gttribe #VRinEdu #googleedu”]
Tip #1: Get Administrator Buy-In
It is always important to get buy-in and support from your administrators and teacher leaders. Our early adopters in the district were quick to reserve the devices, but we needed the support of the campus administrators. At the end of a principal’s meeting in December, our campus and central office administrators went on an Expedition of their own! Many emails to teachers went out that afternoon from principals encouraging the use of the devices and expressing their excitement.
Tip #2: Explore Alternative Funding Options
Since the kits weren’t available for purchase at that time, I took pictures of the Google Expeditions kit that Google brought for the Explorer program. The pieces were available for purchase on Amazon so I priced the kit out. With the pieces that I chose, I estimated that two 30-device kits would cost $6,600. This was beyond my budget capabilities, so grants were my only option. Every spring, the Commerce Schools Educational Enrichment Foundation accepts grant proposals for innovative classroom projects. I wrote the grant and was awarded $6,600 for 2 sets devices, travel case, iPads, and router to run the application.
Funding pilot programs can always be a struggle. Be sure to explore all of your funding options, grants from foundations, DonorsChoose.org, etc. There is money out there if you are willing to dig a little and do the work.
Tip #3: Research Devices Carefully
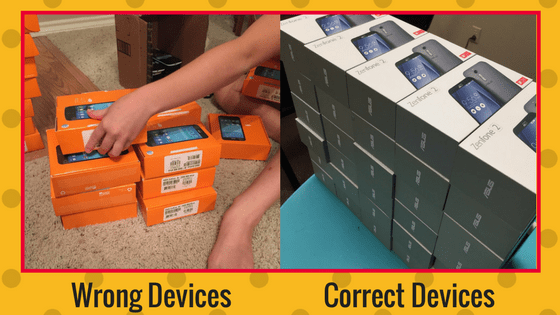
Do your research and select a device that meets the minimum specifications for the Google Expeditions application. If you want the full effect of 360 Expeditions, be sure you buy devices with the accelerometer and gyroscope capability. If you buy them individually and not from a company, be sure and test a single device before purchasing them in bulk.
The components of the kit were ordered in the new budget year and they started arriving in July 2016. Everything was unpacked, custom stickers were designed, and we were ready to set up the devices. This is when I found the problem. Did you know that there is more than one model of the ASUS ZenPhone 2? When I took the pictures of the Explorer kit, I didn’t realize that there was more than one model of this device. The phones that I had priced on Amazon were around $79 each, but they lacked the accelerometer and gyroscope are that are required to make the Expedition app function correctly. This was a huge hiccup in the rollout of these devices since my grant money was spent on 60 wrong devices. The correct devices are around $229 each and I was able to find a company that would sell me 30 of the devices for a discounted $6000.
My Technology Director was just as passionate about this project as I was so he graciously funded the new devices for this project. With the new devices in, we were finally up and running in November 2016.
Check out this crowd-sourced list of compatible devices shared by other educators.
Tip #4: Preview the Expedition and Plan Your Lesson
There is a lot of content in each Expedition, including a teacher guide and script. View all of the scenes in the Expedition prior to the lesson in which you will use them. Not all of the information is applicable to your standards or grade level. Take the content and make it your own. Decide which scenes to cover, where to pause, and how to connect it to your learning goals.
Tip #5: Test with a Small Group of Students
Before you do your first Expedition with a full class, test will a small group of students first. They can help you find what doesn’t work but on a smaller scale. You never know what little things you may want to tweak with the devices, and you want to get in a little practice leading your first expeditions.
Tip #6: Adjust the Device Settings
Our first Expedition was with a small group of seven fourth-grade students who weren’t able to attend the annual trip to the State Capitol in Austin. Instead, these students were my guinea pigs with the Expeditions kit. This was a great learning experience for me. By the time all of the devices were set up, the first phone went to sleep. They are all set to stay awake for 30 minutes now. Of course, the students were in awe of the new technology and learned a lot about the University of Texas at Austin.
There may be other things you learn during your test group that can help you tweak the device settings to better fit your needs and the needs of your students.
Tip #7: Model Best Practices and Processes
Model Use of the Kits for Teachers and Students
Because these devices are fairly delicate, I travel with the kit on the first trip to a new classroom. I show the teachers and students alike how to handle the devices and how to work the program. My hope is to create a culture of respect for these devices to ensure their longevity in our district!
[Tweet “”Create a Culture of Respect for these #GoogleExpeditions Devices” – @TechyKilgore #googleedu”]
Have Students Sit, Not Stand
Have the students sit, but twist in their chair to view the Expeditions. Standing is dangerous as the students can get dizzy and fall over.
Let the Kids, “Ooh,” and “Ahh!”–Noise is Okay!
Let the kids “ooh,” and “ahh,” over the experience! I explained that they needed to keep the viewer up to their eyes and listen to their teacher read the content from the scene, but that I wanted them to enjoy the Expedition. Complete silence wasn’t expected!
Tip #8: Share the Journey
You want the enthusiasm to spread like wildfire in your school, so take videos, pictures and share with your campus and beyond. Share your tips, successes, failures, and more to help other teachers learn from your mistakes.
[Tweet “You want the enthusiasm to spread like wildfire in your school! #googleedu #googleexpeditions #gttribe”]
Check out our playlist of YouTube videos showing our journey with Google Expeditions:
- Our first teacher-led Expedition was a first-grade classroom. They visited the Solar System and covered their TEKS over the sun and the moon. While they were there, the students learned a little about the planets and the Milky Way galaxy.
- Our next Expedition was to the North Pole with a Kindergarten classroom in December. Mrs. Stephanie Pullen took her students to see the actual North Pole with all of the snow and ice. This gave them a real frame of reference to pull from when thinking about where Santa lives! After they visited the real location, they visited the Santa’s Workshop Expedition to visit Santa and his elves plus see the toy workshop in action.
- Another first-grade classroom also went to visit the Solar System. Dee Dee Harris does a wonderful job leading the students through the Expedition pulling prior knowledge that they learned in class and adding the content embedded in the application.
Connect with Heather Kilgore
The Ultimate Cardboard & Expeditions Resource Guide
© Shake Up Learning 2025. Unauthorized use and/or duplication of this material without express and written permission from this blog’s author and/or owner is strictly prohibited. Excerpts and links may be used, provided that full and clear credit is given to Kasey Bell and Shake Up Learning with appropriate and specific direction to the original content on ShakeUpLearning.com. See: Copyright Policy.

Thank you for the information. I had no idea there were two types of ASUS Zen’s, so that is super helpful for when we expand. I think I viewed the same $79 device on Amazon…oops! You probably just saved me $$!
We were able to hit the ground running with VR in my district for just a few hundred dollars. Our administrators receive a district cell phone, and those are updated every two years. Admins received new phones last fall, so I was able to inquire about the old phones, which happened to be Droid Turbos. After some shameless begging, I asked if those old devices could be wiped and repurposed in order to start a VR set. I could not have asked for a better device for VR. I ended up with 10 of the turbos, as well as a few Motorola phones that don’t work for VR but DO work for exploring Expeditions on the teacher side. I purchased 10 Viewmaster VR viewers, and rigged up a charging station for my inherited devices. When teachers would like to look for an Expedition, I loan them a Motorola phone with the apps preloaded. They can’t view in VR from the device, but they can use it as a teacher device and go through the field trip to prepare. We don’t use an independent router, but we have pretty steady district WiFi so that works well in most cases. We run the trip either through one of the Droid’s or Motorola phones, or through an iPad if we have one to spare.
I have absolutely loved the 10 devices we have, because they work so well in a small group setting. I typically schedule a VR trip with a teacher, and ask them to prepare a lesson that has stations or desk work. Then I’m able to pull students back in small groups for a better teaching and learning environment, and we can really dig into a VR trip together. We spend about 10-15 minutes per group depending on the size of the class. For the most part, we’ve used Google Expeditions, but the Viewmaster Solar System trip was PHENOMENAL for grade 3 students. I also used Google Street View to take 6th graders on a tour of the Iditarod, although I missed the ability to change the scene for them on my device. I’ve been busy promoting VR through this flyer: https://www.smore.com/9fehd-virtual-reality-in-your-classroom
VR is a game changer in the classroom. I’m so thankful for this new technology and the excitement and engagement it brings.
Thanks for sharing! Love the small group idea and your smore to teach and promote!
Thank you so much for this comment, Jocelynn! I am happy that this blog may have saved you (and your district) the expense and frustration of buying the wrong device! The Smore that you shared is AWESOME and I can’t wait to view all of the videos and information that you have posted. Thanks again!